Set up BeyondCorp certificate-based access
IAP Desktop supports BeyondCorp certificate-based access . When you enable certificate-based access, all connections to Google Cloud APIs are secured using mutual TLS and you can use enterprise certificate conditions to control access to Google Cloud resources.
Note
This feature requires a BeyondCorp subscription. For a comparison between the features available to Google Cloud customers and what is available with BeyondCorp Enterprise, see BeyondCorp Enterprise pricing .
This guide describes how to do the following:
- Configure an existing Active Directory Certificate Services (AD CS) certificate authority to issue a certificate that's suitable for BeyondCorp.
- Configure Chrome to use the certificate for Endpoint Verification.
- Enable certificate-based access in IAP Desktop.
Configure Active Directory Certificate Services
This section describes how to configure an existing AD CS certificate authority (CA) so that users are automatically issued a certificate that's suitable for BeyondCorp.
To be suitable for BeyondCorp, a certificate must be valid and meet certain requirements, including:
- It must be issued by a CA that's trusted by your Cloud Identity or Google Workspace account.
- It must include an extended key usage (EKU) attribute that permits client authentication.
- It must reside in the Windows user's personal certificate store , so the certificate must be issued to the user, not to a machine. Chrome currently doesn't support using certificates from the local machine certificate store.
The certificate doesn't need to include a user's email address or other information about the user.
Create a certificate template
Create a new certificate template in AD CS by doing the following:
-
Open the Certificate Templates MMC snap-in.
-
Right-click the User template and select All tasks > Duplicate template.
Note
Most standard certificate templates are only suitable for issuing computer certificates. By using the User template as basis, you ensure that BeyondCorp certificates are issued to Windows users' personal certificate store, not to their machine certificate store.
-
On the Compatibility tab, configure the following settings:
- Certificate authority: Windows Server 2012 or a later version
- Certificate recipient: Windows 8/Windows Server 2012 or a later version
-
On the General tab, configure the following settings:
- Template display name: Enter a name like
BeyondCorp User - Validity period: Select a validity period that suits your requirements
- Publish certificate in Active Directory: disabled
- Template display name: Enter a name like
-
On the Request handling tab, configure the following settings:
- Purpose: Signature
- Allow private key to be exported: disabled
-
On the Cryptography tab, configure the following settings:
- Provider category: Key Storage Provider
- Algorithm name: RSA
- Request hash: SHA256
These settings instruct Windows workstations to store private keys using a CNG key storage provider as opposed to a legacy cryptography provider.
Optionally, you can force workstations to use the Microsoft Platform Crypto Provider, which uses the Trusted Platform Module (TPM) to protect private keys:
- Click Requests must use one of the following providers
- Set Microsoft Platform Crypto Provider to Enabled
- Set all other providers to disabled
-
On the Subject name tab, select Build from Active Directory information and configure the following settings:
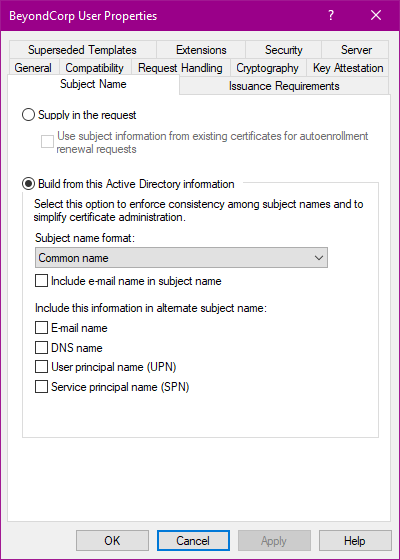
- Subject name format: Common name
- Include e-mail name in subject name: disabled
- E-mail name: disabled
- DNS name: disabled
- User principal name: disabled
- Service principal name: disabled
These settings help limit the risk of bad actors abusing the certificate for other purposes like smart card authentication.
For further details on how Windows determines whether a certificate can be used for smart card authentication, see Client certificate mappings . For additional ways to mitigate risks, see How to disable the Subject Alternative Name for UPN mapping .
-
On the Extensions tab, select Application Policies and click Edit.
In the Edit Application Policies Extension dialog, remove all policies except for Client authentication. Then click OK.
-
On the Security tab, select one or more groups that you want to distribute the certificate to. Grant each group the following permissions:
- Read
- Enroll
- Autoenroll
Verify that no other users or groups are assigned the Enroll or Autoenroll permission.
Note
By default, a template's access control list grants the Domain Users group Enroll permissions. Unless you want to allow all domain users to request a BeyondCorp certificate, remove this access control list entry.
-
Click OK.
You now have a certificate template that's suitable for BeyondCorp, but you must still configure AD CS to use the template for issuing certificates.
Use the template to issue certificates
Configure AD CS to issue certificates based on the new BeyondCorp User certificate template
by doing the following:
- Open the Certificate Authority MMC snap-in.
- Right-click the Certificate Templates folder and select New > Certificate template to issue.
- Select the
BeyondCorp Usercertificate template that you created in the previous step and click OK.
As an Active Directory domain user, you can now manually request certificates on domain-joined workstations by doing the following:
- Open the Certificate management MMC snap-in (
certmgr.msc) - Right-click the Personal folder and select All tasks > Request new certificate....
- On the Before you begin page, click Next.
- On the Select certificate enrollment policy page, select Active Directory Enrollment policy and click Next.
-
On the Request certificates page, select the
BeyondCorp Usercertificate template: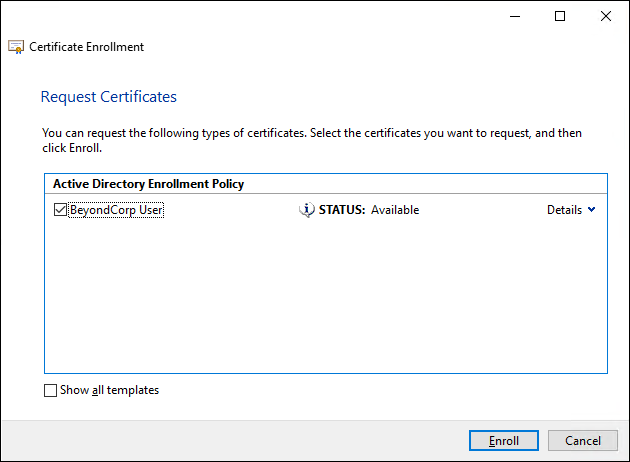
-
Click Enroll.
Set up auto-enrollment
Optionally, you can automate the process of requesting certificates by configuring certificate auto-enrollment :
- Open the Group Policy Management Console MMC snap-in.
- Select the organizational unit that contains the user accounts for which you want to enable auto-enrollment.
- Right-click the organizational unit and select Create GPO in this domain and link it here.
- In the New GPO dialog, enter a name like
BeyondCorp certificate enrollmentand click OK. - Right-click the GPO and select Edit.
Configure the GPO as follows:
- Navigate to User Configuration > Policies > Windows Settings > Security settings > Public key policies
- Open the Certificate Services Client - Auto-Enrollment policy.
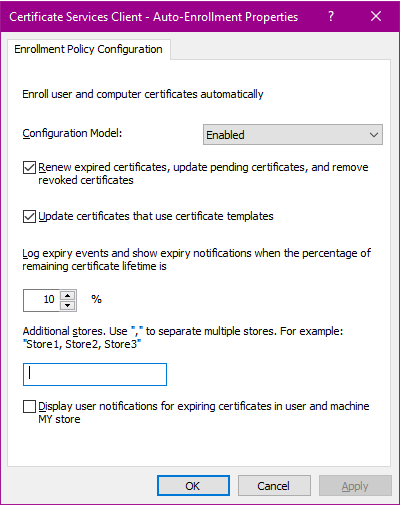
-
Configure the following settings:
- Configuration model: Enabled.
- Renew expired certificates, update pending certificates, and remove revoked certificates: enabled
- Update certificates that use certificate templates: enabled
-
Click OK.
It might take some time before the group policy takes effect on user's workstations. To force
a group policy refresh, run gpupdate /force.
Upload the CA certificate
You're now ready to configure BeyondCorp to trust certificates issued by your AD CS certificate authority.
To configure your AD CS certificate authority as a trust anchor, do the following:
- In the Google Admin console, go to Devices > Networks > Certificates
- Select the organizational unit for which you want to configure certificate-based authentication.
- Click Certificates.
-
On the Certificates page, do the following:
- Click Add Certificate and upload the certificate of your AD CS server.
- Under Certificate Authority, set Endpoint Verification to enabled
- Click Add.
If your CA is a subordinate CA, repeat the steps above to upload the certificate of your root CAs.
Configure Chrome
This section describes how to configure Chrome so that it uses the BeyondCorp User certificate
and enrolls Windows computers in Endpoint Verification.
Deploy Endpoint Verification
To let Chrome enroll Windows computers in Endpoint Verification, you must deploy the Endpoint Verification extension. To automate the deployment of this extension, do the following:
- Configure Chrome to automatically enroll in Chrome browser management .
- Use Chrome browser management to deploy Endpoint Verification .
Configure certificate selection
Chrome and IAP Desktop both rely on
the Chrome AutoSelectCertificateForUrls
policy to determine which certificate to use for the purpose of certificate-based access.
To let Chrome and IAP Desktop use the BeyondCorp User certificate, configure a
AutoSelectCertificateForUrls by doing the following:
- Make sure you've installed the Chrome policy templates.
- Open the Group Policy Management Console MMC snap-in.
- Select the organizational unit that contains the user accounts for which you want to enable auto-enrollment.
- Right-click the organizational unit and select Create GPO in this domain and link it here.
- In the New GPO dialog, enter a name like
Chrome Browser Managementand click OK. - Right-click the GPO and select Edit.
Configure the GPO as follows:
- Navigate to User configuration > Policies > Administrative templates > Google > Google Chrome > Content settings.
- Double-click Automatically select client certificates for these sites.
- Set the policy to Enabled.
- In the Options pane, click Show.
-
In the Show contents dialog, add two entries:
{"pattern":"https://[*.]clients6.google.com","filter":{"ISSUER":{"CN":"COMMON-NAME"}}}{"pattern":"https://console-secure.cloud.google.com","filter":{"ISSUER":{"CN":"COMMON-NAME"}}}
Replace
COMMON-NAMEwith the common name of the AD CS certificate, for exampleCorp Subordinate CA. -
Click OK.
- Click OK.
Again, it might take some time before the group policy takes effect on user's workstations. To force
a group policy refresh, run gpupdate /force. To verify that the policy has been applied on a workstation,
you can do the following:
- Open Chrome.
- Navigate to
chrome://policy. - Verify that the AutoSelectCertificateForUrls policy is listed under Chrome policies.
Note
IAP Desktop does not support Chrome Browser Cloud Management. You must configure the
AutoSelectCertificateForUrls policy using a group policy.
Enable certificate-based access in IAP Desktop
To enable certificate-based access in IAP Desktop, do the following:
- In the application, select Tools > Options.
- Select Secure connections to Google Cloud by using certificate-based access.
- Click OK.
- Close IAP Desktop and launch it again.
Optionally, configure a group policy to automatically enable certificate-based access for your users.