Migrate VMware workload to Compute Engine using Cloud DNS cutover
Migrate an enterprise workload running on VMware vSphere to Compute Engine on Google Cloud using Migrate to Virtual Machines (M2VM).
Architecture
When you finish this guide, the migrated instance serves all traffic through an external load balancer in the target project, and the source workload no longer serves traffic:
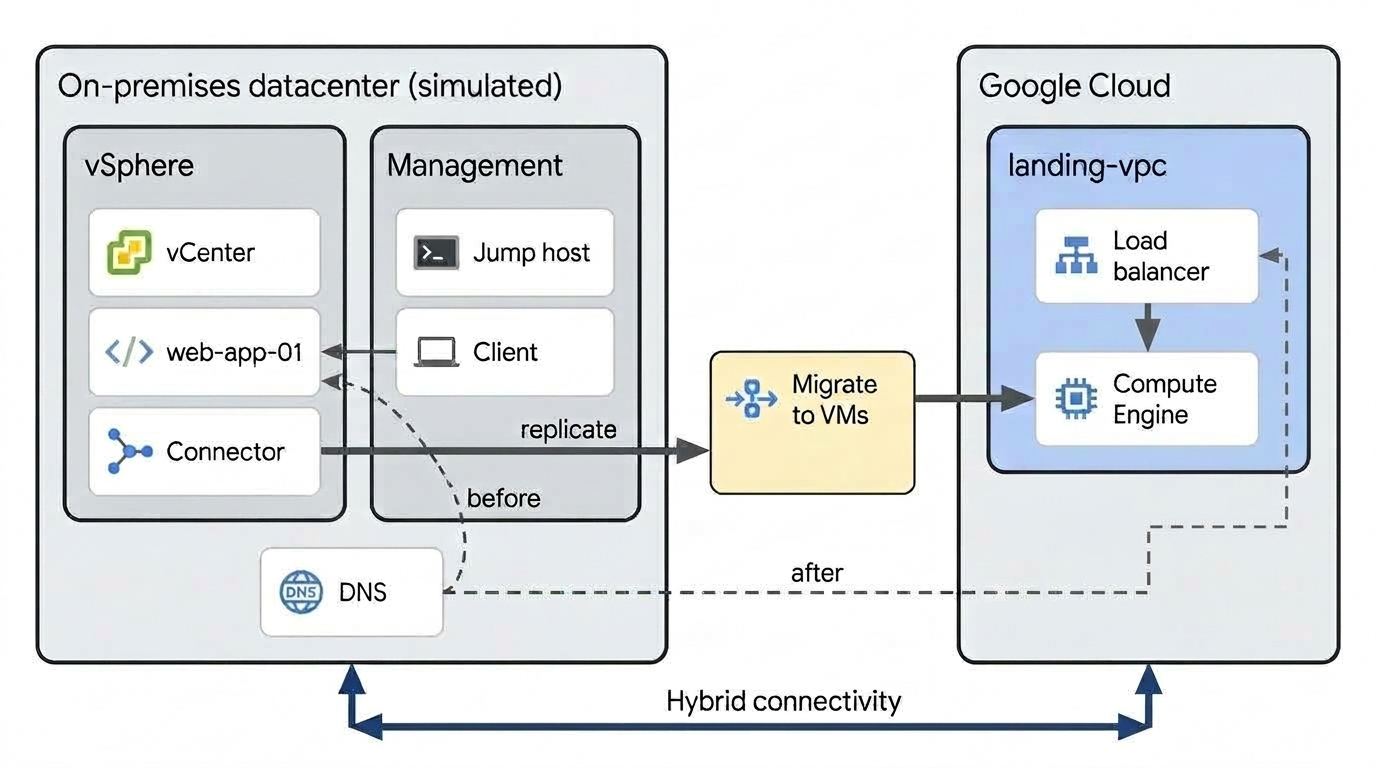
To reach this state, you deploy the target landing zone with Terraform, replicate the workload with Migrate to Virtual Machines, then shift traffic by updating a Cloud DNS record. The source environment matches the one you built in Set up the source environment.
Prerequisites and requirements
Before you follow this guide, complete the following prerequisites:
- Source environment running: Complete all steps in
Set up the source environment to provision the
vSphere source environment, deploy
linux-bastion, and runweb-app-01. - Create a target Google Cloud project (
TARGET_PROJECT_ID): A dedicated Google Cloud project for your destination landing zone. - Google Cloud CLI (gcloud): Configured and authenticated on your local workstation.
- Terraform: Version 1.15.5 or later installed.
Permissions
Ensure your account has the following Identity and Access Management (IAM) roles:
- In
TARGET_PROJECT_ID:roles/compute.adminroles/vmmigration.adminroles/iam.serviceAccountAdminroles/resourcemanager.projectIamAdminroles/serviceusage.serviceUsageAdminroles/orgpolicy.policyAdmin
- In
SOURCE_PROJECT_ID:roles/dns.admin(Required to update the authoritative Cloud DNS A-record during traffic cutover)roles/compute.networkAdmin(Required to establish Virtual Private Cloud (VPC) Network Peering from the source bastion network)
Set up your environment
Authenticate your local workstation tools, load environment variables, and verify that the source VMware workload is serving traffic before starting the migration:
-
Authenticate the Google Cloud CLI and set up Application Default Credentials (ADC) for Terraform:
-
Load your environment variables from
env.sh(created in Set up the environment) and set the activegcloudproject:Run
source env.shin any additional terminal window that you open while following this guide to load the environment variables into your shell session. -
Verify that the source VMware workload is healthy and serving traffic:
The command returns the response from the active VMware workload:
Assess the source environment
Assess your source data center inventory and evaluate the Total Cost of Ownership (TCO) for migrating to Compute Engine.
Access the vSphere Client and inspect the source workload
Launch Google Chrome with isolated host resolver rules to access the vSphere Client and inspect the source workload:
-
Retrieve the administrator password for vCenter:
-
Launch an isolated Google Chrome browser instance that routes requests for the vCenter fully qualified domain name (FQDN) to its external public IP:
google-chrome \ --user-data-dir="/tmp/vcenter-browser" \ --host-resolver-rules="MAP $(terraform -chdir=source/infra output -raw vcenter_fqdn) $(terraform -chdir=source/infra output -raw vcenter_public_ip)" \ --ignore-certificate-errors \ "https://$(terraform -chdir=source/infra output -raw vcenter_fqdn)" -
In the browser window, click LAUNCH VSPHERE CLIENT and sign in:
- Username:
CloudOwner@gve.local - Password: Enter the password that you retrieved earlier.
- Username:
-
In the left navigation pane, select Hosts and Clusters and select the management cluster (
demo-pc-v2-mgmt) or folder (Workload VMs). -
Select the VMs tab to inspect
web-app-01. Note its provisioned hardware specifications:- vCPU: 2
- Memory: 2 GB
- Provisioned Storage: ~20 GB (0.02 TiB)
- IP Address: 10.10.20.15
-
Click the table Export icon in the VMs view, choose Export to CSV, and save
vsphere_inventory.csvto your workstation. Keep this browser tab open for deploying the Migrate Connector later in this guide.
Estimate TCO with Gemini in Migration Center
Evaluate the Total Cost of Ownership (TCO) for migrating your VMware workload to Compute Engine using the Gemini-assisted Migration Center estimator:
Initialize Migration Center
- In the Google Cloud console for
TARGET_PROJECT_ID, navigate to Migration Center. - Click Get Started.
- Configure the initial onboarding settings:
- Region:
us-central1 - Account: Select Add custom account and enter
TEST. - Opportunity: Select Add custom opportunity and enter
TEST.
- Region:
- Click Next, then click Continue.
Generate a quick TCO estimate
- On the Migration Center Overview page, locate the banner: A first look at the new Gemini-assisted Migration Center.
- Click Try now to navigate to the Gemini-assisted migration workspace. Alternatively, navigate directly to Gemini-assisted migration.
- On the Quick TCO estimator tile, click Open.
- Click Create new estimate.
- Under Basic details:
- Estimate name:
migrate-vmware-to-gce-estimate - Click Next.
- Estimate name:
- Under Source workload, enter the specifications verified from the
vSphere inventory:
- Provisioned VMs:
1 - Provisioned vCPU:
2 - Provisioned RAM (GB):
2 - Provisioned storage (TiB):
0.02 - Click Next.
- Provisioned VMs:
- Under Compute Engine configuration:
- Region:
us-west2 - Machine family:
General-purpose - Machine series:
E2 - Disk family:
PD Balanced - Click Next.
- Region:
Analyze with Gemini and export artifacts
- Review the generated estimate tabs: Summary, Technical breakdown, and Pricing breakdown.
- In the interactive Gemini chat panel, click one of the suggested prompt
options:
- How can I optimize my cloud costs?
- Explain the Committed Use Discount (CUD) plan details
- Review Gemini's cost optimization recommendations and commitment discount breakdown.
- Click Artifacts in the top navigation bar.
- Click Create Sheet, then open the generated Google Sheet to review the detailed estimate offline.
Deploy landing infrastructure
Deploy the destination landing zone, including the target VPC network, outbound gateway, external load balancer, and hybrid network peering.
In this demo environment, Terraform establishes VPC Network Peering between
landing-vpc and bastion-vpc to simulate hybrid connectivity. In an
on-premises migration, connect your data center to Google Cloud using
Cloud Interconnect
or
Cloud VPN (HA VPN)
with Cloud Router
for dynamic BGP route exchange.
landing-subnet reuses 10.10.20.0/24, the same CIDR as the source workload
segment, so web-app-01 keeps its 10.10.20.15 address across the migration.
The instance group starts empty. You add the migrated instance to it after
cutover, so the load balancer serves no traffic until that step.
Warning
To allow the migrated BIOS workload to boot, receive an external IP address if
needed, authenticate the Migrate Connector, and establish VPC Network Peering,
this configuration modifies four organization policy constraints in the target
project: compute.vmExternalIpAccess, compute.requireShieldedVm,
iam.disableServiceAccountKeyCreation, and compute.restrictVpcPeering. Use
a dedicated demo project, and restore the constraints when you finish.
-
Source
env.shand apply the landing zone configuration:
Deploy and register the Migrate Connector
Deploy the Migrate Connector appliance in vCenter and register it with Migrate
to Virtual Machines in TARGET_PROJECT_ID.
Deploy the OVF template in vCenter
In the active vSphere Client browser session, deploy the Migrate Connector appliance into the source vSphere environment:
-
Display your Google Cloud compute public key, which you need for the next step:
-
In the vSphere inventory pane, right-click the compute cluster (
demo-pc-v2-mgmt) and select Deploy OVF Template. -
In the deployment wizard, select URL and enter the public Google Cloud Storage URL for the Migrate Connector OVA:
Because Google Cloud VMware Engine (GCVE) communicates with Cloud Storage over Google's internal network backbone, vCenter streams the 1.1 GB appliance directly in approximately 20 to 30 seconds without uploading across your local workstation connection.
-
Click Next and configure the deployment wizard settings:
- Virtual machine name:
m2vm-connector - Folder:
Workload VMs - Compute resource:
demo-pc-v2-mgmt - Storage:
vsanDatastore(Thin Provision) - Destination network:
demo-workload - Public keys: SSH public key from
cat ~/.ssh/google_compute_engine.pub - Google API address:
Public - IP address:
10.10.20.10 - Netmask:
255.255.255.0 - Default gateway:
10.10.20.1 - DNS server:
192.168.0.234
- Virtual machine name:
-
Click NEXT > FINISH. Monitor the Recent Tasks pane in vCenter until the import completes.
-
In vCenter, right-click
m2vm-connectorand select Power > Power On. Verify network and SSH reachability throughlinux-bastion:source env.sh gcloud compute ssh linux-bastion \ --zone="${ZONE}" \ --project="${SOURCE_PROJECT_ID}" \ --tunnel-through-iap \ -- nc -zv -w 2 10.10.20.10 22Expected output:
Register the connector with Migrate to Virtual Machines
Register the connector appliance with Migrate to Virtual Machines and connect it to vCenter so it can discover and replicate your source workloads:
-
Initiate a password reset for
solution-user-01@gve.local(GCVE creates solution user accounts dormant without initial passwords), wait until the operation completes, and generate an Application Default Credentials (ADC) access token:source env.sh gcloud vmware private-clouds vcenter credentials reset \ --private-cloud=demo-pc-v2 \ --location=${ZONE} \ --project=${SOURCE_PROJECT_ID} \ --username=solution-user-01@gve.local \ --no-async VCENTER_PWD=$(gcloud vmware private-clouds vcenter credentials describe \ --private-cloud=demo-pc-v2 \ --location=${ZONE} \ --project=${SOURCE_PROJECT_ID} \ --username=solution-user-01@gve.local \ --format="value(password)") M2VM_TOKEN=$(gcloud auth application-default print-access-token) echo "vCenter password: ${VCENTER_PWD}" echo "Access token: ${M2VM_TOKEN}" -
Open a new terminal session and connect to
m2vm-connectorover SSH usinglinux-bastionas a proxy: -
In the appliance shell, start the registration CLI:
-
Provide the configuration parameters when prompted:
- vCenter host IP:
192.168.0.2 - vSphere thumbprint: Verify and enter
Y - vCenter username:
solution-user-01@gve.local - vCenter password: Paste the value of
${VCENTER_PWD}from the other terminal window where you ran the previous command. - Google Cloud access token: Paste the value of
${M2VM_TOKEN}from the other terminal window where you ran the previous command. - Target project: Select your
TARGET_PROJECT_ID. - Region:
us-west2 - Source name:
vsphere-source - Enter the KMS key: Press Enter to use the default Google-managed encryption.
- Appliance service account: Select
m2vm-connector-sa
- vCenter host IP:
-
Verify the connector registration:
Example output:
Appliance connectivity and health: Migrate Connector appliance health: Healthy Appliance version: 2.8.2977 Proxy setting: not enabled DNS: 192.168.0.234 Gateway: 10.10.20.1 Google API connection type: Public Cloud APIs network connection: Reachable VM Migration service: Registered with VM Migration service: True Connectivity to VM Migration service: True Project: TARGET_PROJECT_ID Location: us-west2 Source name: vsphere-source Data center connector name: vsphere-source-dybulw Migrate Connector service account: m2vm-connector-sa@TARGET_PROJECT_ID.iam.gserviceaccount.com On-Prem environment: vCenter address: 192.168.0.2 vSphere user name is: solution-user-01@gve.local Max upload rate: Unlimited -
In the Google Cloud console, navigate to Migrate to Virtual Machines > Sources, and verify that
vsphere-sourcereports a status of Connected.
Note
If you ever re-run m2vm register on an existing appliance, such as to switch
target projects or refresh expired credentials, Migrate to Virtual Machines
generates a new connector UUID. You must delete any existing migration objects
in the console and re-add them under Sources > vsphere-source > Add
migration.
Migrate and cutover
Migrate the workload to Compute Engine and execute the cutover. The cutover includes a brief planned maintenance window while Migrate to Virtual Machines shuts down the source VM for final delta replication.
Replicate the workload to Compute Engine
Configure continuous disk replication from the VMware source VM to Compute Engine in your target project. Complete all steps in this section in the Google Cloud console:
- Navigate to Migrate to Virtual Machines > Sources.
- Select
web-app-01and click Add migration > VM migration > Confirm. - Navigate back to the Migrating VMs tab, select
web-app-01, and click Edit target details:- General tab:
- Target project: Select
${TARGET_PROJECT_ID} - Target VM name:
web-app-01 - Zone: Select
${ZONE}(us-west2-a)
- Target project: Select
- Machine configuration tab:
- Machine configuration section:
- Series:
E2 - Machine type:
e2-medium
- Series:
- Management section:
- On host maintenance:
Migrate VM instance - Automatic restart:
On
- On host maintenance:
- Machine configuration section:
- Networking tab:
- Edit the network interface:
- Network:
landing-vpc - Subnetwork:
landing-subnet - Internal IP: Select Custom and enter
10.10.20.15 - External IP:
None
- Network:
- Edit the network interface:
- Additional configuration tab:
- Service account: Select
web-app-01-sa@${TARGET_PROJECT_ID}.iam.gserviceaccount.com
- Service account: Select
- General tab:
- Click Save.
- Select
web-app-01and click Migration > Start replication. - Wait for replication status on the Replication history tab to show Active (Idle).
Test the migration with a test clone
Validate the migrated application and network connectivity in the target VPC without affecting the active source workload by deploying a test clone:
- In the Google Cloud console, navigate to the Migrating VMs tab, select
web-app-01, and click Test-Clone. - Confirm the prompt and wait approximately 2 to 3 minutes until the status displays Clone completed (Test-Clone Succeeded).
-
In your local terminal, verify that the cloned Compute Engine instance is running in the target project with its assigned internal IP (
10.10.20.15): -
Verify private network reachability to the test clone by curling its internal IP from
demo-client. Becausebastion-vpcroutes10.10.20.0/24across VPC peering tolanding-vpc, this verifies the Compute Engine instance inTARGET_PROJECT_ID. The active source VM accepts external traffic only on its public IP:gcloud compute ssh demo-client \ --zone=${ZONE} \ --project=${SOURCE_PROJECT_ID} \ --tunnel-through-iap \ -- curl -s http://10.10.20.15/The command returns the response from the application running on the test clone:
-
Delete the test-clone instance in Compute Engine to free the instance name and IP before cutover:
Execute workload cutover
Perform the final cutover by shutting down the source VM, executing a delta synchronization, deploying the production Compute Engine instance, and switching Cloud DNS traffic to the load balancer:
-
Open a new terminal window, run
source env.sh, and stream responses fromdemo-client:source env.sh gcloud compute ssh demo-client \ --zone="${ZONE}" \ --project="${SOURCE_PROJECT_ID}" \ --tunnel-through-iap \ -- tail -f /var/log/demo-watch.logThe continuous watcher polls
www.vmware-demo.example.comevery two seconds. The output confirms that client traffic resolves to the source VMware workload's public IP:18:16:38 www.vmware-demo.example.com -> 34.94.250.150 {"message": "Hello World"} (0.042s) 18:16:40 www.vmware-demo.example.com -> 34.94.250.150 {"message": "Hello World"} (0.039s) 18:16:43 www.vmware-demo.example.com -> 34.94.250.150 {"message": "Hello World"} (0.041s)Keep this terminal window open alongside your browser during cutover to monitor the traffic transition in real time.
-
In the Google Cloud console, navigate to Migrate to Virtual Machines > Migrating VMs.
- Select
web-app-01, click Cut over, and confirm the prompt. - Wait approximately 2 to 4 minutes until the migration status displays
Cutover completed (Cutover succeeded), and verify that
web-app-01appears in Compute Engine with status RUNNING. -
In your initial terminal window (not the streaming window), attach
web-app-01to the unmanaged instance group: -
Verify that the load balancer backend reports
HEALTHY: -
Update the authoritative Cloud DNS A-record in the source project to the load balancer frontend IP:
-
In the streaming watcher terminal window, observe the planned cutover maintenance window and the subsequent transition to the load balancer IP:
....
20:55:37  www.vmware-demo.example.com -> 34.94.250.150   {"message": "Hello World"} (0.042s)
20:55:39  www.vmware-demo.example.com -> 34.94.250.150   (no response)
...
21:09:59  www.vmware-demo.example.com -> 34.20.130.98   {"message": "Hello World"} (0.012s)
...
The period of
(no response)reflects the planned maintenance window during which Migrate to Virtual Machines shuts down the source VM to ensure storage consistency during final delta replication. Because the DNS TTL is 10 seconds, traffic resumes within seconds after the DNS record updates.For workloads that require a minimal-downtime cutover without a maintenance window, see the Hybrid connectivity network endpoint groups overview.
Decommission the source workload
The source environment still exists. Migrate to Virtual Machines stopped
web-app-01 but did not delete it, and the Migrate Connector keeps running
until you remove it. Both continue to incur cost, so decommission them once you
finish validating the migration.
To remove the source environment, follow Clean up the source environment.
Keep the source environment running if you plan to repeat the migration. To rerun it, restore the source VM and start a new replication cycle rather than rebuilding the vSphere environment.
Optimize the migrated environment
To optimize your Compute Engine workloads after migration, see the following Google Cloud guidance:
- Observability and monitoring: See the Cloud Architecture Center guide Monitor everything, and deploy the Google Cloud Ops Agent for sub-minute memory, disk I/O, and application log collection.
- Rightsizing: See the Cloud Architecture Center guide Reduce resource costs, and use Active Assist to apply machine type recommendations for VM instances after establishing baseline production traffic.
- Discounts and commitments: See Cost management in Google Cloud, and review options for Committed use discounts (CUDs) and automatic Sustained use discounts (SUDs).
Clean up target landing infrastructure
Destroy the target landing infrastructure when testing is complete:
-
Remove
web-app-01from the unmanaged instance group: -
Delete the cutover VM instance:
-
Destroy the landing infrastructure using Terraform:
-
After tearing down the target environment, tear down the source private cloud and networking by completing the steps in Clean up the source environment.