Technical Implementation Guide: Modernizing Data Apps with the Data Agent Kit
1. Introduction
This guide is specifically designed for experienced developers looking to accelerate the development of end-to-end full-stack applications using Google Cloud. It demonstrates how to leverage advanced AI database capabilities—including vector search, hybrid search, and graph traversal—to move beyond traditional development hurdles.
Traditional data application development is often mired in "glue code"—the repetitive work of provisioning instances, defining DDLs, writing CRUD wrappers, and managing environment dependencies. Agents are moving beyond basic automation to complex, multi-agent systems orchestrated by reasoning models, allowing developers to focus on high-level technical intent while the agent handles operational heavy lifting.
The Google Cloud Data Agent Kit (Data Agent Kit) and the Antigravity IDE provide a unified interface for interacting with your data. This integration allows you to connect to databases, explore schemas, and execute advanced SQL or GraphQL queries directly within the IDE's catalog view. By leveraging built-in skills, such as automated database provisioning, you can configure your infrastructure in real-time, enabling you to build intelligent applications without leaving your IDE environment.
Why this matters for Productivity:
- Infrastructure as a Conversation: No more hunting through the GCP Console for instance configurations.
- Schema Evolution via Reasoning: The agent infers relational and graph relationships based on your business case.
- Unified Context: The agent maintains the "state" of your app across the database, backend, and frontend tiers simultaneously.
2. Environment Setup & Prerequisites
Pre-requisites
- Google Cloud Project: A project with billing enabled.
- Google Account: A Google account with a Gemini Pro or Gemini Ultra subscription.
- Antigravity IDE Installed: Users must have the Antigravity agentic IDE installed to orchestrate this workflow.
-
NodeJS and Python development environments: Ensure Node.js, npm, python3 and Pip are installed on your system. You can install them using:
-
Google Cloud's Data Agent Kit: The Google Cloud's Data Agent Kit must be installed within Antigravity.
The Google Cloud Data Agent Kit is a comprehensive collection of Agentic Skills, MCP tools, and IDE extensions designed to accelerate your development workflow. It provides prescriptive, "golden path" guidance that allows agents to interact securely and intelligently with Google Cloud data ecosystems.
By integrating directly into your development environment, the kit bridges the gap between your intent and operational deployment, enabling faster, more reliable application building.
This is critical as it allows developers to visually explore their database catalog and run queries directly inside the IDE.
- Install the Google Cloud Data Agent Kit extension.
- Sign into the Data Agent Kit extension.
- For the purposes of this demo: Configure a Spanner MCP server only.
-
Global Onboarding Skill: Install the Onboarding Skill globally to streamline API enablement and essential configuration. You can prompt the agent directly to automate this setup:
Install the following skill globally: https://github.com/google/skills/blob/main/skills/cloud/google-cloud-recipe-onboarding/SKILL.mdVerify that the agent returns a confirmation that it has successfully installed the
google-cloud-recipe-onboardingskill globally, followed by details on its installation path. A sample response follows this pattern:I have successfully installed the google-cloud-recipe-onboarding skill globally. Here is a summary of the actions taken: Created the global skill directory at ~/.gemini/config/skills/google-cloud-recipe-onboarding/. Downloaded the raw content of SKILL.md. Saved it as SKILL.md in the global skills directory. -
Global LLM Configuration: Establish global rules for LLM selection to ensure the coding agent utilizes the most recent model versions optimized for specific developer workloads. Open the global rules file located at
~/.gemini/GEMINI.mdand append the rules from global-rules.txt:1. When generating text embeddings in Google Cloud the default embedding model is text-embedding-005 if nothing else is specified. 2. For usage of LLM in code and agents, the default model is gemini-2.5-flash-lite if nothing else is specified. 3. When using Agent Development Kit (ADK) use the latest version 2.0.0 for the google-adk package if nothing else is specified. -
Developer Knowledge MCP: The Developer Knowledge MCP Server equips your coding agent with authoritative, real-time context from Google's extensive developer documentation ecosystem.
By integrating this server, your agent gains access to up-to-date best practices across multiple domains—including Google Cloud, Firebase, and Android—ensuring that generated code and technical guidance remain accurate and aligned with current standards.
Access the Antigravity configuration file located at
~/.gemini/antigravity/mcp_config.jsonand incorporate the server definition from the sample configuration in mcp-config.json within themcpServersobject, replacingPROJECT_IDwith your Google Cloud project ID:
Workspace Setup
Create a new workspace directory, for example demo-workspace.
mkdir ~/demo-workspace
For the rest of this tutorial, this workspace directory will be referred to as
demo-workspace
Copy the Spanner provisioning agent skill into your workspace directory under
the .gemini/skills folder:
mkdir -p ~/demo-workspace/.gemini/skills
cp -r support/.gemini/skills/spanner-provisioning ~/demo-workspace/.gemini/skills/
Open this workspace directory within the Antigravity IDE to begin the orchestration workflow.
- File -> Open Folder
- Select
demo-workspacein your home directory.
Project and Region Configuration
Follow these steps to link the Data Agent Kit to your cloud project and define the deployment region for your database resources:
- Open the Data Cloud Settings editor by selecting the Google Cloud Data Agent Kit icon from the activity bar.
- You will be prompted to log in with Google Cloud again.
- Expand the SETTINGS group.
- Click on the Settings option.
- Choose the Common section.
- Input your Google Cloud Project ID and Region. Ensure you use the project where you want to create the demo resources.
- Select Save.
- You are prompted to synchronize extension sessions with the Google Cloud CLI - click the button to perform the synchronization.
- Scroll to Spanner API and click Enable API.
Review required roles
- Also in the Google Cloud Data Agent Kit Settings, Common Section, Click Required Permissions
- The Access column indicates whether you are a principal in a required role.
- For this demo, check that all the Spanner permissions are granted, ask your administrator to grant you the corresponding Identity and Access Management (IAM) roles on the project. For more information about granting roles, see Manage access to projects, folders, and organizations.
The Agentic Coding Workflow
To ensure the development process remains both manageable and transparent, we have structured the workflow into distinct, sequential phases. Each stage is designed to produce a modular, clearly defined component of the complete application. The target reference architecture is illustrated below:
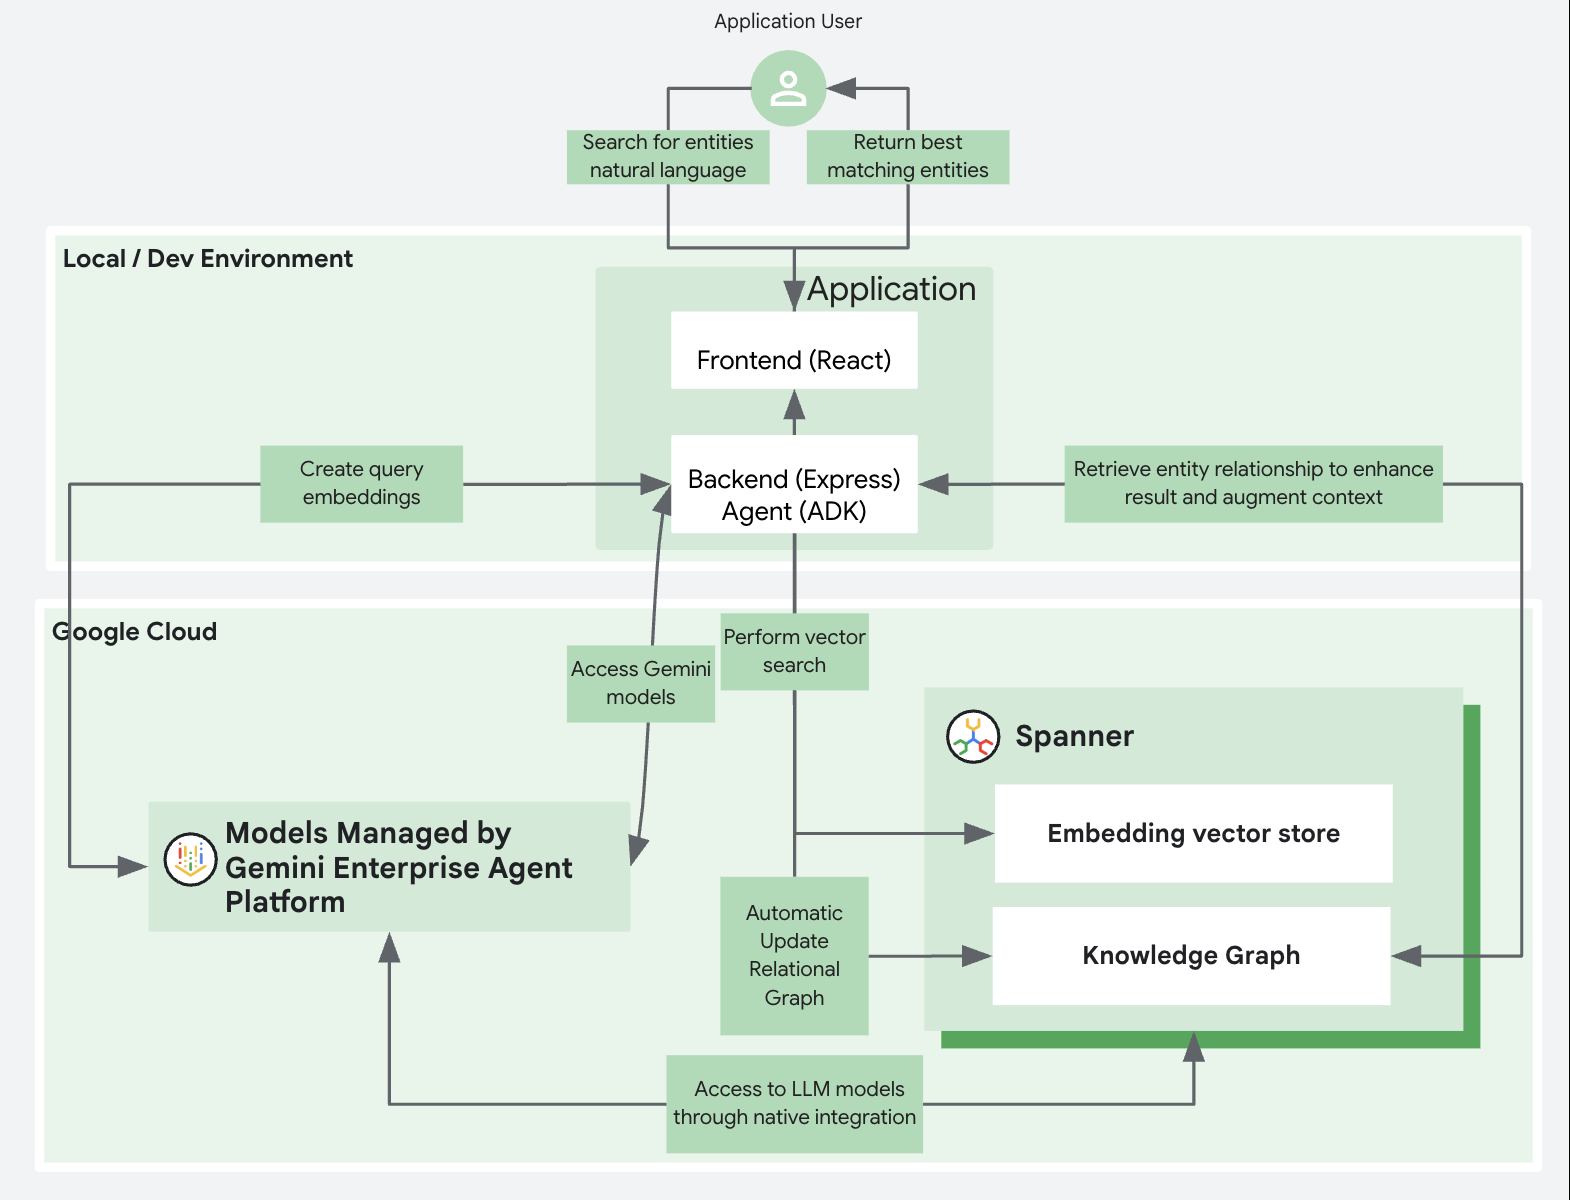
The demo employs a classic three-tier architecture, featuring an operational, agentic AI-native database tier powered by Google Cloud. We utilize Cloud Spanner to demonstrate advanced AI capabilities, including knowledge graph-based search and vector embedding search.
The application layers consist of:
- A backend developed with ExpressJS to provide API services.
- A frontend built as a ReactJS application.
To streamline the setup, both the frontend and backend components are hosted on the developer's local machine.
Source Code
The source code, samples, and reference implementation for the use case detailed in this document are available in our GitHub repository. Please refer to this repository for the complete project structure, setup instructions, and deployment scripts.
Understanding the Demo Flow
IMPORTANT NOTE: Large Language Models (LLMs) are non-deterministic. While your run aligns with the general structure, schema, and steps, the exact phrasing of the implementation plans, generated descriptions, or specific code snippets in your workspace may differ from the screenshots. Use these screenshots as illustrative examples of the expected workflow and user interface.
Throughout this tutorial, you will follow a consistent interaction pattern with the agent. Here is the standard workflow for executing each step:
- Input the Prompt: Enter the provided demo prompt into the agent interface.
- Review the Plan: The agent will generate an implementation plan. Carefully review this plan to verify that it matches your instructed intent.
- Refine if Necessary: If the plan does not align with your goals, add a comment and feed it back to the agent so it can update the proposed steps.
- Proceed: Once the implementation plan looks good, click the Proceed button located at the top of the implementation plan.
- Approve Commands: During the implementation phase, the agent may prompt you to approve multiple execution commands. Review and approve these commands to allow the agent to run them in your environment.
- Review Documentation: After the implementation is complete, review the generated Task and Walkthrough docs to understand the specific details of what was implemented.
3. Demo Use Case : Ticketing & Incident Management
In this scenario, users log incidents and tickets into the system.
The application leverages Agentic Workflows to perform semantic analysis on these entries, automatically linking common tickets together based on their content, and providing visualizations to map and explore the causal relationships between incidents.
In this specific implementation, we will highlight the following AI capabilities:
- Similarity searches powered by vector embeddings to facilitate semantic querying across tickets.
- Graph representations to map and visualize the causal relationships between different ticket entries.
- Leverage an agentic workflow to facilitate the automatic linking of relationships between new and existing tickets.
Step 1: Database Provisioning & Schema Creation
During this step, the agent analyzes your prompt to understand your intent and environment specifics (such as production vs. dev/test), allowing it to automatically provision an appropriately sized database instance. Beyond mere infrastructure setup, the agent identifies the ideal data schema and generates the DDL required for database construction, which significantly reduces the need for detailed manual instructions. After provisioning is complete, you can use the Google Cloud's Data Agent Kit to examine the new tables and schema directly within your IDE. To ensure the agent has the context needed for more sophisticated reasoning, remember to include your overarching project objectives in this first prompt.
Review the reference DDL schema at schema.sql to understand the target structure, including the ticket table schema, relationship edge tables, vector search index configuration, and property graph definition.
Demo Prompt - Database provisioning
Paste the following prompt into the agent:
I am developing a basic ticket tracking system for cases to investigate the graph and vector search
features of a Spanner database.
Please set up a new Spanner test instance, ensuring it is configured for workloads involving graph
traversal, retrieval, and search.

Generate the required database schemas for a Ticket domain object, including

- Title and Description fields
- Other logical attributes (like priority, status, or timestamp) to ensure the system is realistic
- A Spanner Graph schema using these tickets as nodes, including directed edges for BLOCKS
  and CAUSES relationships.

Provide the CLI commands for provisioning for my review, and then run them on the Spanner
instance once confirmed.
Show implementation plan
View the implementation plan and click Proceed.


After the implementation has finished do the following steps to explore the tables and the table schemas from the Data Agent Kit - Catalog UI:
- Expand the Catalog in the Data Agent Kit UI
- Expand the project name
- Expand Spanner
- Expand the instance name
- Expand the database name
- Expand the Tables to show the tables that were created.
- Click on one of the Tables to show the Schema.
Demo Prompt - for automating the persistence of the commands, paste the following prompt into the agent:
To make this workflow easily reproducible, save the database provisioning commands and the
schema creation DDL into a script file titled db_provisioning.sh.
Review Documentation: After the implementation is complete, review the
generated db_provisioning.sh script and understand the detailed provisioning
steps.
Step 2: Intelligent Data Generation & IDE Verification
In this step, instruct the AI to populate the schema with realistic, interconnected sample data, which is essential for properly testing the database's AI features. A crucial step here is to have the AI generate the necessary SQL or GraphQL queries; use the Google Cloud's Data Agent Kit to run these queries directly against your new data, allowing you to visually verify the results, such as a graph traversal.
Demo Prompt - Generate Test Data
Paste the following prompt into the agent:
Generate sample data representing 100 interconnected support tickets.
Ensure the data realistically populates all fields, but pay special attention to making the Title and
Description highly detailed and creative. Use realistic IT and infrastructure scenarios—for example:


- 'Major Fiber Cut in us-central1'
- 'Substation Power Outage in the bigger New York Data Center'
- 'Database Latency Spike in EU-West'.

To properly test the graph capabilities, build logical clusters of data where the relationships make
contextual sense based on the ticket text.

For example, if you create a 'Root Cause' ticket for a 'Regional Power Grid Failure in Zone B', use a
CAUSES edge to connect it to logically related downstream tickets, like a
'Network Switch Offline in Zone B' and an 'Application Timeout Error'.

Finally, populate the Spanner tables with this node and edge data, and persist it locally into a file for
future use.
Show agent output

Demo Prompt - GraphQL Selection
Paste the following prompt into the agent:
Verifying with Spanner Query Tabs
Follow these steps to execute the generated query and explore the data:
- Navigate to one of the created tables from the Catalog view in Data Agent Kit.
- Right-click the table and select Query.
- Replace the existing default query in the query editor with the generated GraphQL query.
- Click the Run Query button (represented by a play icon
▷at the top of the editor menu bar) to execute the query.
Note
If the query editor is not pointing to the correct database, you can configure it by clicking the Open Spanner Query Settings button next to the Run Query button.
Visualize the results of the query execution in the bottom pane, for example for the Causes table:

Step 3: Backend API Scaffolding
In this step, you will direct Antigravity to generate a backend structure—such as an ExpressJS server—complete with essential CRUD functionality and specialized endpoints designed to run the complex queries validated in the prior stage. The IDE handles all local dependency management automatically and can provide curl commands for instant verification, enabling a swift validation of how your API interacts with the AI-native database.
Demo Prompt - Backend scaffolding
Paste the following prompt into the agent:
Develop a backend service using ExpressJS to interface with our Spanner database, handling all local
dependency installation and management.

The service should include:

- Standard CRUD operations for ticket management.
- A specialized endpoint for graph traversal queries to fetch a root cause alongside its
  associated cases.

Additionally, provide:

- The necessary startup scripts.
- A collection of sample curl commands to facilitate API testing.

Ensure all backend source code is organized within a specific 'backend/' directory.
View the implementation plan and click Proceed.
Show agent backend output

Verify the implementation by launching the backend server (typically using the
generated startup script or commands), executing the curl commands (either from
the agent's response or a generated script file like curl_tests.sh), and
confirming the accuracy of the returned JSON data.
Step 4: React Development & Automated UI Verification
Once your backend is operational, use a framework such as React to construct the frontend, providing a visual interface for AI-generated relationships and database insights. To maintain high quality standards, leverage the integrated browser agent within Antigravity; it can autonomously explore your web app to test UI components and produce detailed walkthrough reports, including screen recordings of functional workflows.
Demo Prompt - Create Frontend
Paste the following prompt into the agent, verify the implementation plan and click Proceed.
Utilize React to architect and implement the project's frontend.

The interface must feature:

- A contemporary dashboard grid to present the tickets.
- Incorporate a dedicated detail view that visualizes a ticket's graph connections—such as blocking status or
  root cause associations—by interfacing with the ExpressJS backend.

Perform the initialization of the frontend service, including:

- The installation of all required SDKs and dependencies.
- The generation of the source code.

Ensure all frontend source code is organized within a specific frontend/ directory.
Note
Once the frontend service is initialized, the agent will typically output the
local server URL (e.g., http://localhost:5173). Make a note of this URL, as
you will need it to access the application manually in later steps.
Demo Prompt - Automated UI Validation:
Paste the following prompt into the agent, verify the implementation plan and click Proceed.
Access the local frontend application using the integrated browser agent.

Conduct an automated UI test to confirm the proper operation of:

- Ticket creation.
- The visualization of root-cause relationships.

Produce a detailed walkthrough report that outlines the testing steps and includes screen recordings
of the automated sessions.
Demo Note: Walkthrough of the generated UI testing report.
View the generated UI test report, for example:

Step 5: Enhancing with Agentic Workflows
In this final step, we transition from a standard full-stack setup to an advanced agentic system using the Agent Development Kit (ADK). By instructing the coding agent to embed autonomous capabilities, you enable your application to proactively monitor data and execute logic independently.
The demonstration focuses on automating root-cause analysis: the agent monitors incoming tickets in real-time, evaluates their descriptions against the existing database, and automatically generates "causes" relationships within Spanner Graph for highly correlated cases.
Demo Prompt - Agent Creation
Paste the following prompt into the agent, verify the implementation plan and click Proceed.
Use the Python Agent Development Kit (google-adk) to build
an automated workflow that monitors incoming tickets.

The system should perform the following:

- Analyze ticket descriptions against existing records.
- Automatically establish CAUSES links between the new and existing tickets
  within the Spanner Graph when a high degree of similarity is detected.
Once completed, the agent should have created a similarity workflow running in
the background, checking for new tickets and automatically linking CAUSES for
similar tickets.
Interactive Demo Steps:
- Open the Frontend: Open the Ticket User frontend interface created in Step 4.
- Inspect Existing Tickets: Look at some of the existing tickets.
- Create a Similar Ticket: Create a new ticket with a description that is highly semantically related to an existing ticket (e.g., if an older ticket is "Regional Power Grid Failure in Zone B," create a new one titled "Network Switch Offline in Zone B").
- Trigger the Agent: Submit the ticket. This prompts the ADK agent in the background to perform a vector similarity search and map the graph edge. You may need to close and reopen your new ticket for the UI to refresh.
-
Troubleshoot (Optional): If no causality linkage is shown, check the logs by submitting this prompt to the agent:
If the ticket description is not similar enough, the linkage might be skipped. For example:
A new ticket ID 104 was detected.
Embedding Generation: The service automatically generated its embedding...
Vector Search: It found candidate Ticket 101 with a Cosine Distance of
0.3608 (below the 0.40 threshold).
Agent Causal Analysis: The ADK LlmAgent was invoked with both ticket
details. It determined that the DNS lookup issues did not have a direct
causal link...
No Link Action: Based on the agent's negative assessment, no causal edge
was inserted.
4. Best Practices for Agentic Application Development
-
Start with Planning: Use the agent as an architectural consultant before building the actual application.
Drafting a technical specification or PRD first ensures the database schema and API contracts align with your objectives. This proactive planning prevents the agent from making incorrect assumptions that could lead to extensive, misaligned code generation and project rework.
Practical Application: Use the Comment on this inline function to provide precise feedback and change requests to the agent, iteratively refining the plan and architecture.

-
Incremental Development: With a clear Product Requirements Document (PRD) and technical design in place, you can derive smaller, clearer tasks for the agent.
As showcased throughout the demo, we broke the complex task of building the full-stack application into multiple small, testable steps. This approach allows for incremental verification, making each step more controllable and easier to verify.
Crucially, prioritizing smaller features limits the blast radius if the agent implements something incorrectly, making it much easier to simply roll back to the last working state rather than untangling a spaghetti of errors.
-
Session Scoping & Context Management The most common cause of degraded agent performance is "context pollution" from a single, endlessly long chat thread. As the agent accumulates more messages, file edits, and error logs in one session, it loses track of earlier instructions.
Fix: Adopt strict session scoping: once a feature (like the backend API) is built and verified, close the session. Start a fresh conversation for the next feature. Because Antigravity reads the current state of your local codebase, the new session will have perfect, up-to-date context without carrying the heavy baggage of previous debugging errors.
-
Aggressive Version Control & Branching Because agentic tools can rapidly modify or rewrite multiple files across your repository simultaneously, a single misaligned prompt can introduce widespread regressions that are difficult to untangle.
Fix:
-
Treat frequent, descriptive Git commits as mandatory "save points" that you create before issuing any major prompt to the agent.
This gives you a concrete fallback mechanism. In practice, if the agent hallucinates, deletes important logic, or introduces complex errors, you do not waste time prompting the AI to debug the resulting regressions.
Instead, you instantly roll back your repository to the exact working state it was in before the changes were applied, and try a different prompt.
-
Leveraging standard Git branching strategies allows you to safely isolate these agent-driven experiments.
By branching off your main codebase, you can delegate complex features to the agent without risking the stability of your core application. This approach gives you the flexibility to work on multiple features concurrently across different branches, ensuring that you only merge code back into the main branch once the agent's implementation has been fully verified and tested.
-
5. Troubleshooting
The Paradigm Shift: Agentic vs. Traditional Troubleshooting
Troubleshooting within an agentic coding workflow shifts the diagnostic process from manual log analysis to structured context resolution. Because the coding agent operates with a unified context layer—combining natural language inputs with programmatic access to local development tools and command-line interfaces—the debugging workflow integrates directly with your active environment.
Instead of manually isolating stack traces and transferring error data between independent tools, developers interact with the agent using the complete workspace and tool state.
Practical Application: Leverage commands like /@terminal:bash and
@Files:[file-name]#L10-20 to reference terminal outputs and specific code
segments, eliminating the need to manually paste logs or snippets into your
prompts.
Direct Database Diagnostics via the Data Agent Kit
A core capability of this workflow is the agent’s direct integration with the data layer via the Google Cloud Data Agent Kit. Utilizing specialized programmatic tools and built-in skills, the agent queries the live database instance to isolate, reproduce, and resolve database errors directly.
The agent can programmatically query the database to troubleshoot:
- Schema Configurations: Automated detection and remediation of mismatched data types, missing constraints, or out-of-sync Spanner Graph node and edge DDL definitions.
- Data Edge & Value Anomalies: Direct inspection of row data to isolate boundary conditions, string truncation issues, or orphaned graph edges causing constraint violations.
- Query Performance & Logic Optimization: Execution and debugging of complex SQL, GQL, or GraphQL queries to resolve syntax errors, identify missing indexes, or optimize inefficient graph traversals before code execution.
Practical Application: By default, the agent has all tools and services at its
disposal and will automatically select the most appropriate ones for the task.
However, you can explicitly direct the agent to use specific skills or tools in
your prompt by using the @[mcp-service] or /[skill] syntax (e.g.,
@mcp:spanner or /gcp-data-pipelines).
Pinpointing Issues with Multi-Modal Context
Developers can describe and isolate bugs by referencing environmental artifacts directly within the chat interface:
- Direct Artifact Referencing: Input explicit references to terminal execution output, specific source files, or exact line numbers where runtime exceptions occurred.
- Multi-Modal Attachments: For frontend layout issues—such as rendering bugs or malformed components in the generated React dashboard—developers can attach screenshots directly to the chat interface. This simplifies the process of identifying and defining UI-specific rendering defects.
The agent uses this input alongside its local execution tools to run automated diagnostics, execute contextual terminal commands, and aggregate the necessary technical context to implement code fixes.
Practical Application: To refine the frontend UI, users can annotate graphical elements within screen recordings in UI test reports. These marked changes can then be sent back to the agent as specific requests for modification.

Correcting Misinterpretations via Collaborative Planning Docs
If developers experience architectural drift, or if the agent misinterprets design constraints, the alignment can be corrected outside of the primary chat thread.
- Interactive Commenting: The generated Implementation Plans and Planning Documents support direct inline commenting.
- Granular Corrections: If an implementation path diverges from the technical specifications, developers can add a comment at the exact block or line where the logic went wrong.
- Text and Visual Feedback: This feedback mechanism applies to both database/backend logic and frontend UI configurations, ensuring intent is corrected before code generation begins.