Deploy the Token Service
Warning
The Token Service project has been archived and is no longer being maintained.
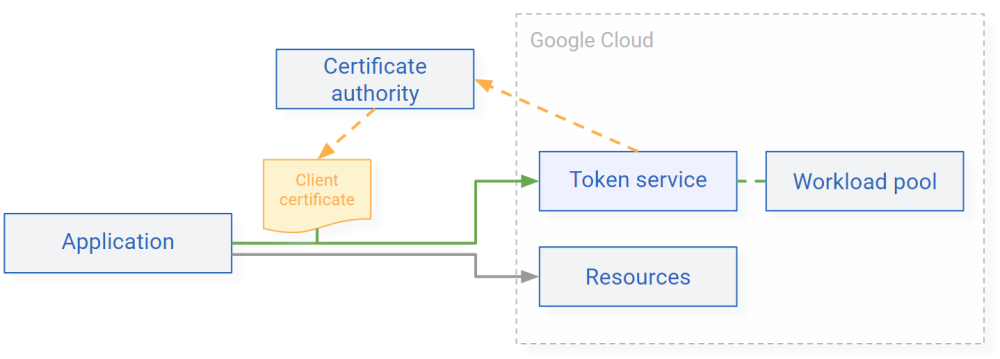
This article describes how you can deploy the token service on Cloud Run and configure it so that it can authenticate clients using mutual TLS (mTLS).
Before you begin
To follow the instructions in this guide, you need the following:
- An X.509 certificate authority that can issue client certificates.
- The CA certificate of the certificate authority.
- A CA-issued client certificate that you can use to test the deployment.
Prepare your Google Cloud project
-
Select or create a Google Cloud project.
-
Enable billing for your project.
-
In the Google Cloud console, enable the Cloud Run, Resource Manager, and IAM Credentials APIs.
-
Open Cloud Shell.
-
Set an environment variable to contain your project ID:
gcloud config set project PROJECT_IDReplace
PROJECT_IDwith the ID of your project. -
Create a service account for the Token Service application:
SERVICE_ACCOUNT=$(gcloud iam service-accounts create token-service --display-name "Token Service" --format "value(email)")You later use this service account and attach it to the Cloud Run service.
-
Grant the service account the Service Account Token Creator (
roles/iam.serviceAccountTokenCreator) role on itself so that the Token Service application can use the service account to sign JSON Web Tokens:gcloud iam service-accounts add-iam-policy-binding $SERVICE_ACCOUNT \ --member "serviceAccount:$SERVICE_ACCOUNT" \ --role "roles/iam.serviceAccountTokenCreator" \ --condition None
Deploy the application
You now deploy the Token Service application to Cloud Run:
-
Create a new workload identity pool:
POOL_ID=POOL
gcloud iam workload-identity-pools create $POOL_ID \
    --location="global" \
    --display-name="NAME"
Replace the following:
POOL: pool ID. Use an ID that describes the type of workloads or devices that you’re authenticating, for example altostrat-widgets.NAME: the display name, for example Altostrat IoT widgets.
-
In Cloud Shell, select a region to deploy to:
gcloud config set run/region REGIONReplace
REGIONwith a region that supports Cloud Run. -
Clone the GitHub repository and switch to the latest branch:
git clone https://github.com/GoogleCloudPlatform/iam-federation-tools.git cd iam-federation-tools/token-service git checkout latest -
Build the application and push the container image to Container Registry:
PROJECT_ID=$(gcloud config get-value core/project) docker build -t gcr.io/$PROJECT_ID/token-service:latest . docker push gcr.io/$PROJECT_ID/token-service:latest -
Create a configuration file for the Token Service application:
PROJECT_NUMBER=$(gcloud projects describe $PROJECT_ID --format 'value(projectNumber)')
REGION=$(gcloud config get-value run/region)

cat << EOF > app.yaml

apiVersion: serving.knative.dev/v1
kind: Service
metadata:
  name: token-service
  namespace: $PROJECT_NUMBER
  labels:
    cloud.googleapis.com/location: $REGION
  annotations:
    run.googleapis.com/ingress: internal-and-cloud-load-balancing
spec:
  template:
    spec:
      serviceAccountName: $SERVICE_ACCOUNT
      containers:
      - image: gcr.io/$PROJECT_ID/token-service:latest
        env:
        - name: AUTH_FLOWS
          value: "xlb-mtls-client-credentials"
        - name: TOKEN_VALIDITY
          value: "5"
        - name: WORKLOAD_IDENITY_PROJECT_NUMBER
          value: "$PROJECT_NUMBER"
        - name: WORKLOAD_IDENITY_POOL_ID
          value: "$POOL_ID"
        - name: WORKLOAD_IDENITY_PROVIDER_ID
          value: "token-service"
        - name: MTLS_HEADER_CLIENT_ID
          value: "X-Client-Cert-Hash"

EOF
In this configuration file, you can customize the values of the variables. For a list of settings, see Configuration.
-
Deploy the application:
gcloud run services replace app.yaml -
Allow the application to handle authentication itself instead of requiring clients to authenticate with Google first:
gcloud run services add-iam-policy-binding token-service \
    --member="allUsers" \
    --role="roles/run.invoker"
Configure a load balancer
You now deploy a load balancer.
-
Enable the Compute Engine, Certificate Manager, and Network Security APIs.
-
Reserve a static external IP address for the load balancer:
gcloud compute addresses create token-service-ip --global -
Create a managed SSL certificate for the load balancer:
PUBLIC_FQDN=FQDN
gcloud compute ssl-certificates create token-service \
  --domains $PUBLIC_FQDN \
  --global
where
FQDNis the public, fully qualified domain name (FQDN) that you want to use, for exampletoken-service.example.com. -
Look up the IP address of the load balancer:
gcloud compute addresses describe token-service-ip \ --global \ --format "value(address)" -
Create a DNS A record in your public DNS zone that points to the IP address of the load balancer. The fully qualified name of the DNS record must match the name that you used for the SSL certificate.
Note
It can take multiple minutes or hours for the new DNS record to propagate. During this time, the managed SSL certificate can't be used. For details, see Troubleshooting Google-managed certificates .
-
Create a backend service :
gcloud compute backend-services create token-service-backend \ --load-balancing-scheme=EXTERNAL \ --global -
Create a serverless network endpoint group for the Cloud Run service and connect it to the backend service:
gcloud compute network-endpoint-groups create token-service \ --region $(gcloud config get-value run/region) \ --network-endpoint-type=serverless \ --cloud-run-service token-service gcloud compute backend-services add-backend token-service-backend \ --global \ --network-endpoint-group token-service \ --network-endpoint-group-region $(gcloud config get-value run/region) -
Create a load balancer frontend that uses the external IP address and forwards traffic to the backend service:
gcloud compute url-maps create token-service \ --default-service token-service-backend gcloud compute target-https-proxies create token-service-proxy \ --ssl-certificates token-service \ --url-map token-service gcloud compute forwarding-rules create token-service-https \ --load-balancing-scheme EXTERNAL \ --address token-service-ip \ --target-https-proxy token-service-proxy \ --global \ --ports=443 -
Use the load balancer’s public FQDN and register the Token Service application as a workload identity pool provider:
gcloud iam workload-identity-pools providers create-oidc token-service \ --location="global" \ --workload-identity-pool=$POOL_ID \ --issuer-uri="https://$PUBLIC_FQDN" \ --attribute-mapping="google.subject=assertion.client_id, attribute.client_x5_spiffe=assertion.client.x5_spiffe, attribute.client_x5_dnssan=assertion.client.x5_dnssan, attribute.client_x5_urisan=assertion.client.x5_urisan, attribute.client_x5_sha256=assertion.client.x5_sha256, attribute.client_x5_serial=assertion.client.x5_serial" -
Perform an HTTP request to the Token Service to verify that it has been deployed successfully:
curl -L https://$PUBLIC_FQDN | jqThe output is the OIDC metadata of the Token Service:
{
  "issuer": "https://token-service.example.com/",
  "authorization_endpoint": "https://token-service.example.com/token",
  "token_endpoint": "https://token-service.example.com/token",
  "jwks_uri": "https://www.googleapis.com/service_accounts/v1/metadata/jwk/token-service@project.iam.gserviceaccount.com",
  "response_types_supported": [
    "none"
  ],
  "grant_types_supported": [
    "client_credentials"
  ],
  "subject_types_supported": [
    "none"
  ],
  "id_token_signing_alg_values_supported": [
    "RS256"
  ],
  "token_endpoint_auth_methods_supported": [
    "tls_client_auth"
  ]
}
If you see an SSL-related error message instead, then provisioning the certificate might still be in progress. For details, see Troubleshooting Google-managed certificates .
Configure mTLS
You now configure the load balancer to verify mTLS certificates:
-
Copy the PEM-formatted certificates of your certificate authority:
- Copy the PEM-formatted root certificate of your certificate authority to a file named
ca.cer.
- Copy the PEM-formatted root certificate of your certificate authority to a file named
ca.cer. - Copy the PEM-formatted intermediate CA certificate to a file named
intermediate-ca.cer.
Note
The contents of the
.cerfiles must start with-----BEGIN CERTIFICATE-----. - Copy the PEM-formatted root certificate of your certificate authority to a file named
-
Create a TrustConfig resource in Certificate Manager:
Create a TrustConfig resource that contains your CA root certificate:
cat << EOF > token-service-ca.yaml
name: token-service-ca
trustStores:
- trustAnchors:
   - pemCertificate: "$(cat ca.cer | sed 's/^[ ]*//g' | tr '\n' $ | sed 's/\$/\\n/g')"
EOF

gcloud beta certificate-manager trust-configs import token-service-ca \
  --source token-service-ca.yaml
Create a TrustConfig resource that contains both, your CA root and intermediate CA certificate:
cat << EOF > token-service-ca.yaml name: token-service-ca trustStores: - trustAnchors: - pemCertificate: "$(cat ca.cer | sed 's/^[ ]*//g' | tr '\n' $ | sed 's/\$/\\n/g')" intermediateCas: - pemCertificate: "$(cat intermediate-ca.cer | sed 's/^[ ]*//g' | tr '\n' $ | sed 's/\$/\\n/g')" EOF gcloud beta certificate-manager trust-configs import token-service-ca \ --source token-service-ca.yaml -
Create a TLS policy that instructs the load balancer to validate client certificates by using the TrustConfig resource that you created in the previous step:
cat << EOF > token-service-mtls.yaml
name: token-service-mtls
mtlsPolicy:
  clientValidationMode: ALLOW_INVALID_OR_MISSING_CLIENT_CERT
  clientValidationTrustConfig: projects/$PROJECT_ID/locations/global/trustConfigs/token-service-ca
EOF

gcloud beta network-security server-tls-policies import token-service-mtls \
    --source token-service-mtls.yaml \
    --location global
Note
You must use validation mode
ALLOW_INVALID_OR_MISSING_CLIENT_CERTso that workload identity federation can access the Token Service API. -
Update the load balancer’s target proxy configuration so that it uses the new TLS policy:
{ gcloud compute target-https-proxies export token-service-proxy --global; echo "serverTlsPolicy: //networksecurity.googleapis.com/projects/$PROJECT_ID/locations/global/serverTlsPolicies/token-service-mtls" } > token-service-proxy.yaml gcloud compute target-https-proxies import token-service-proxy \ --global \ --source token-service-proxy.yaml \ --quiet -
Update the load balancer’s backend configuration so that it propagates information from client certificates in custom request headers :
gcloud compute backend-services update token-service-backend \
  --global \
  --enable-logging \
  --logging-sample-rate=1 \
  --custom-request-header='X-Client-Cert-Present: {client_cert_present}' \
  --custom-request-header='X-Client-Cert-Chain-Verified:{client_cert_chain_verified}' \
  --custom-request-header='X-Client-Cert-Error:{client_cert_error}' \
  --custom-request-header='X-Client-Cert-Hash:{client_cert_sha256_fingerprint}' \
  --custom-request-header='X-Client-Cert-Serial-Number:{client_cert_serial_number}' \
  --custom-request-header='X-Client-Cert-SPIFFE:{client_cert_spiffe_id}' \
  --custom-request-header='X-Client-Cert-URI-SANs:{client_cert_uri_sans}' \
  --custom-request-header='X-Client-Cert-DNSName-SANs:{client_cert_dnsname_sans}' \
  --custom-request-header='X-Client-Cert-Valid-Not-Before:{client_cert_valid_not_before}' \
  --custom-request-header='X-Client-Cert-Valid-Not-After:{client_cert_valid_not_after}'
It might take up to 1 hour for changes to take effect.
The token service is now ready to authenticate clients.
What's next
- Read how to authenticate clients using the token service
- Protect the token service using Google Cloud Armor security policies