Deployment
This starter pack uses a robust, production-ready deployment strategy that combines Terraform for infrastructure as code and a CI/CD pipeline for automated builds, tests, and deployments. You can choose between Google Cloud Build and GitHub Actions as your CI/CD runner.
The recommended way to deploy your agent is with the agent-starter-pack setup-cicd command, which automates the entire process.
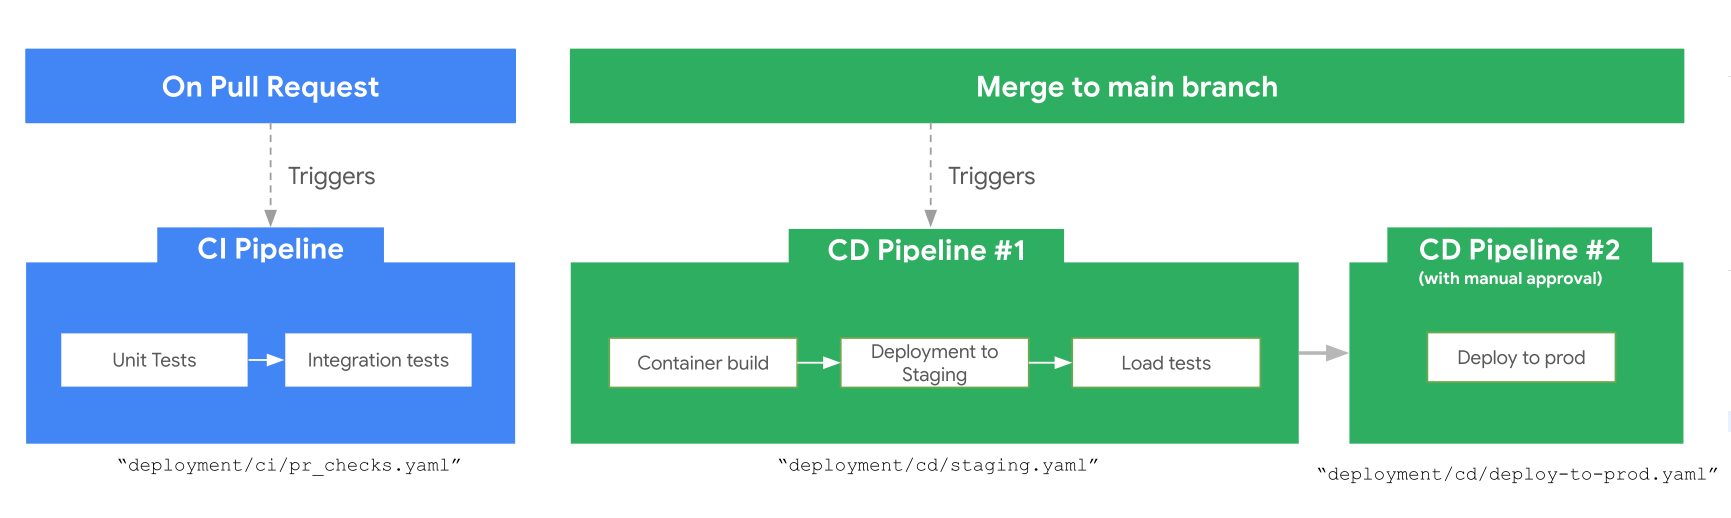
Deployment Workflow
The CI/CD pipeline is designed with best practices for deploying applications safely and reliably.
Description:
CI Pipeline (e.g.,
.github/workflows/pr_checks.yamlor.cloudbuild/pr_checks.yaml):- Triggered on pull request creation/update.
- Runs unit and integration tests to ensure code quality.
Staging CD Pipeline (e.g.,
.github/workflows/staging.yamlor.cloudbuild/staging.yaml):- Triggered on merge to the
mainbranch. - Builds and pushes the application container to Artifact Registry.
- Deploys the new version to the staging environment.
- Performs automated load testing against the staging environment.
- Triggered on merge to the
Production Deployment (e.g.,
.github/workflows/deploy-to-prod.yamlor.cloudbuild/deploy-to-prod.yaml):- Triggered after a successful staging deployment.
- Requires manual approval before proceeding to production.
- Deploys the same container image that was tested in staging to the production environment.
Development Environment Deployment
If you want to deploy a standalone development environment without setting up the full CI/CD pipeline, you can use the make setup-dev-env command.
Set your Dev Project:
bashgcloud config set project <your-dev-project-id>Deploy Dev Infrastructure: This command runs the Terraform configuration in
deployment/terraform/devto provision a development environment.bashmake setup-dev-envDeploy the Application: Once the infrastructure is ready, deploy your agent to the dev environment.
bashmake deploy
Automated Deployment with setup-cicd
For a streamlined, one-command deployment of the entire CI/CD pipeline and infrastructure, use the setup-cicd command from the root of your generated project.
uvx agent-starter-pack setup-cicdThis command handles all the necessary steps:
- Infrastructure Provisioning: Uses Terraform to create and configure the necessary resources in your staging and production Google Cloud projects.
- CI/CD Configuration: Sets up a complete CI/CD pipeline with your chosen runner (Google Cloud Build or GitHub Actions), including triggers for pull requests and merges to the main branch.
- Repository Connection: Connects your GitHub repository to the CI/CD provider.
For a complete guide on the command and its options, see the setup-cicd CLI Reference.
Required Variables
The deployment uses Terraform variables that need to be configured for your environment. These are defined in agent-starter-pack/base_template/deployment/terraform/variables.tf:
Core Configuration
project_name: Base name for resource naming (default: auto-generated from cookiecutter)prod_project_id: Google Cloud Project ID for production deploymentstaging_project_id: Google Cloud Project ID for staging deploymentcicd_runner_project_id: Google Cloud Project ID where CI/CD pipelines executeregion: Google Cloud region for resources (default:us-east1)
Repository Connection
repository_name: Name of your GitHub repositoryrepository_owner: GitHub username or organization namehost_connection_name: Name for Cloud Build connection (default: auto-generated)
Service Account Permissions
app_sa_roles: Roles for the application service accountcicd_roles: Roles for CI/CD runner service accountcicd_sa_deployment_required_roles: Deployment roles for staging/prod projects
CI/CD Provider Specific
For Cloud Build:
github_app_installation_id: GitHub App Installation IDgithub_pat_secret_id: GitHub Personal Access Token Secret IDcreate_cb_connection: Whether to create new Cloud Build connection
For GitHub Actions:
create_repository: Whether the repository already exists
Data Ingestion (Optional)
If data ingestion is enabled:
pipeline_cron_schedule: Cron schedule for automated ingestion (default: weekly)pipelines_roles: Roles for Vertex AI Pipelines service account
Vector Search Configuration (Optional)
If using Vertex AI Vector Search:
vector_search_embedding_size: Embedding dimensions (default: 768)vector_search_approximate_neighbors_count: Neighbors to return (default: 150)vector_search_min/max_replica_count: Scaling configurationvector_search_shard_size: Shard size (default: SHARD_SIZE_SMALL)vector_search_machine_type: Instance type (default: e2-standard-2)
Logging Configuration
telemetry_logs_filter: Log filter for telemetry datafeedback_logs_filter: Log filter for feedback data
End-to-end Demo video