Automatic data tokenizing pipelines
![]()
This document discusses how to identify and tokenize data with an automated data transformation pipeline to detect sensitive data like personally identifiable information (PII), using Cloud Data Loss Prevention (Cloud DLP) and Cloud KMS. De-identification techniques like encryption lets you preserve the utility of your data for joining or analytics while reducing the risk of handling the data by obfuscating the raw sensitive identifiers.
To minimize the risk of handling large volumes of sensitive data, you can use an automated data transformation pipeline to create de-identified datasets that can be used for migrating from on-premise to cloud or keep a de-identified replica for Analytics. Cloud DLP can inspect the data for sensitive information when the dataset has not been characterized, by using more than 100 built-in classifiers.
One of the daunting challenges during data migration to cloud is to manage sensitive data. The sensitive data can be in structured forms like analytics tables or unstructured like chat history or transcription records. One needs to use Cloud DLP to identify sensitive data from both of these kinds of sources, followed by tokenizing the sensitive parts.
Tokenizing structured data can be optimized for cost and speed by using representative samples for each of the columns to categorize the kind of information, followed by bulk encryption of sensitive columns. This approach reduces cost of using Cloud DLP, by limiting the use to classification of a small representative sample, instead of all the records. The throughput and cost of tokenization can be optimized by using envelope encryption for columns classified as sensitive.
This document demonstrates a reference implementation of tokenizing structured data through two tasks: sample and identify, followed by bulk tokenization using encryption.
This document is intended for a technical audience whose responsibilities include data security, data processing, or data analytics. This guide assumes that you’re familiar with data processing and data privacy, without the need to be an expert.
Watch the video to learn how the tool works:
Architecture
The solution comprises two pipelines (one for each of the tasks):
- Sample + Identify
- Tokenize
Sample & Identify Pipeline

The sample & identify pipeline extracts a few sample records from the source files. The identify part of pipeline then decomposes each sample record into columns to categorize them into one of the in-built infotypes or custom infotypes using Cloud DLP. The sample & identify pipeline outputs following files to Cloud Storage:
- Avro schema of the file
- Detected info-types for each of the input columns.
Tokenization Pipeline

The tokenize pipeline then encrypts the user-specified source columns using the schema information from the sample & identify pipeline and user provided enveloped data encryption key. The tokenizing pipeline performs following of transforms on each of the records in the source file:
- Unwrap data-encryption key using Cloud KMS
- un-nest each record into a flat record.
- tokenize required values using deterministic AEAD encryption.
- re-nest the flat record into Avro record
- Write Avro file with encrypted fields
Concepts
- Envelope Encryption is a form of multi-layer encryption, involving use of multiple layers of keys for encrypting data. It is the process of encrypting the actual data encryption key with another key to secure the data-encryption key.
- Cloud KMS provides easy management of encryption keys at scale.
- Tink is an open-source library that provides easy and secure APIs for handling encryption/decryption. It reduces common crypto pitfalls with user-centered design, careful implementation and code reviews, and extensive testing. At Google, Tink is one of the standard crypto libraries, and has been deployed in hundreds of products and systems. Tink natively integrates with Cloud KMS for use with envelope encryption technique.
- Deterministic AEAD encryption is used by to serve following purposes:
- Permits use of the cipher-text as join keys. The deterministic property of the cipher ensures that cipher-text for the same plain-text is always the same. Using this property one can safely use the encrypted data for performing statistical analysis like cardinality analysis, frequency analysis etc.
- store signed plain-text within the cipher to assert authenticity.
- reversibility, use of 2-way encryption algorithm permits reversing the algorithm to obtain original plain-text. Hashing does not permit such operations.
-
Cloud Data Loss Prevention is a Google Cloud service providing data classification, de-identification and re-identification features, allowing you to easily manage sensitive data in your enterprise.
-
Record Flattening is the process of converting nested/repeated records as flat table. Each leaf-node of the record gets a unique identifier. This flattening process enables sending data to DLP for identification purposes as the DLP API supports a simple data-table.
Consider a contact record, for Jane Doe, it has a nested and repeated field
contacts.{ "name": "Jane Doe", "contacts": [ { "type": "WORK", "number": 2124567890 }, { "type": "HOME", "number": 5304321234 } ] }Flattening this record yields a FlatRecord with following data. Notice the
valuesmap, which demonstrates that each leaf node of the contact record is mapped using a JsonPath notation. ThekeySchemashows a mapping between the leaf value’s key’s to a schema key to demonstrate that leaf-nodes of same type share the same key-schema, for example:$.contacts[0].contact.numberis logically same as$.contacts[1].contact.numberas both of them have the same key-schema$.contacts.contact.number.{ "values": { "$.name": "Jane Doe", "$.contacts[0].contact.type": "WORK", "$.contacts[0].contact.number": 2124567890, "$.contacts[1].contact.type": "WORK", "$.contacts[1].contact.number": 5304321234 }, "keySchema": { "$.name": "$.name", "$.contacts[0].contact.type": "$.contacts.contact.type", "$.contacts[0].contact.number": "$.contacts.contact.number", "$.contacts[1].contact.type": "$.contacts.contact.type", "$.contacts[1].contact.number": "$.contacts.contact.number" } }
Prerequisites
This tutorial assumes some familiarity with shell scripts and basic knowledge of Google Cloud.
Objectives
- Understand record sampling and identify sensitive columns using DLP.
- Use of symmetric encryption to tokenize data using KMS wrapped data-encryption key.
Costs
This tutorial uses billable components of Google Cloud, including the following:
Use the pricing calculator to generate a cost estimate based on your projected usage.
Before you begin
For this tutorial, you need a Google Cloud project. To make cleanup easiest at the end of the tutorial, we recommend that you create a new project for this tutorial.
- Create a Google Cloud project.
- Make sure that billing is enabled for your Google Cloud project.
-
At the bottom of the Cloud Console, a Cloud Shell session opens and displays a command-line prompt. Cloud Shell is a shell environment with the Cloud SDK already installed, including the gcloud command-line tool, and with values already set for your current project. It can take a few seconds for the session to initialize.
- Enable APIs for Cloud DLP, Cloud KMS, Compute Engine, Cloud Storage, Dataflow and BigQuery services with the following command:
shell script
gcloud services enable \
dlp.googleapis.com \
cloudkms.googleapis.com \
compute.googleapis.com \
storage.googleapis.com \
dataflow.googleapis.com \
bigquery.googleapis.com
Setting up your environment
-
In Cloud Shell, clone the source repository and go to the directory for this tutorial:
shell script git clone https://github.com/GoogleCloudPlatform/auto-data-tokenize.git cd auto-data-tokenize/ - Use a text editor of your choice to modify the
set_variables.shfile to set required environment variables. ```shell scriptThe Google Cloud project to use for this tutorial
export PROJECT_ID=”
" The Compute Engine region to use for running Dataflow jobs and create a
temporary storage bucket
export REGION_ID=”
" define the GCS bucket to use as temporary bucket for Dataflow
export TEMP_GCS_BUCKET=”
" Name of the service account to use (not the email address)
export DLP_RUNNER_SERVICE_ACCOUNT_NAME=”
" Name of the GCP KMS key ring name
export KMS_KEYRING_ID=”
" name of the symmetric Key encryption kms-key-id
export KMS_KEY_ID=”
" The JSON file containing the TINK Wrapped data-key to use for encryption
export WRAPPED_KEY_FILE=”
" ```` - Run the script to set the environment variables:
shell script
source set_variables.sh
Creating resources
The tutorial uses following resources
- Service account to run data flow pipelines enabling fine-grain access control
- A symmetric Cloud KMS managed Key Encryption key, this is used to wrap the actual data encryption key
- Cloud Storage bucket for temporary data storage and test data
Create service accounts
We recommend that you run pipelines with fine-grained access control to improve access partitioning. If your project does not have a user-created service account, create one using following instructions.
You can use your browser by going to Service accounts in the Cloud Console.
- Create a service account to use as the user-managed controller service account for Dataflow:
shell script gcloud iam service-accounts create ${DLP_RUNNER_SERVICE_ACCOUNT_NAME} \ --project="${PROJECT_ID}" \ --description="Service Account for Tokenizing pipelines." \ --display-name="Tokenizing pipelines" -
Create a custom role with required permissions for accessing DLP, Dataflow and KMS: ```shell script export TOKENIZING_ROLE_NAME=”tokenizing_runner2”
gcloud iam roles create ${TOKENIZING_ROLE_NAME}
–project=${PROJECT_ID}
–file=tokenizing_runner_permissions.yaml ``` - Apply the custom role to the service account:
shell script gcloud projects add-iam-policy-binding ${PROJECT_ID} \ --member="serviceAccount:${DLP_RUNNER_SERVICE_ACCOUNT_EMAIL}" \ --role=projects/${PROJECT_ID}/roles/${TOKENIZING_ROLE_NAME} - Assign the
dataflow.workerrole to allow the service account to allow it to run as a Dataflow worker:shell script gcloud projects add-iam-policy-binding ${PROJECT_ID} \ --member="serviceAccount:${DLP_RUNNER_SERVICE_ACCOUNT_EMAIL}" \ --role=roles/dataflow.worker
Create Key encryption key
The data would be encrypted using a Data Encryption Key (DEK). You will use envelope encryption technique to encrypt the DEK using a Key in Cloud KMS, this ensures that the DEK can be safely stored without compromising it.
- Create KMS Key-ring
shell script gcloud kms keyrings create --project ${PROJECT_ID} --location ${REGION_ID} ${KMS_KEYRING_ID} - Create KMS symmetric key to use for encrypting your data encryption key.
shell script gcloud kms keys create --project ${PROJECT_ID} --keyring=${KMS_KEYRING_ID} --location=${REGION_ID} --purpose="encryption" ${KMS_KEY_ID} -
Download and unpack the latest version of Tinkey. Tinkey is an open source utility to create wrapped encryption keys.
shell script mkdir tinkey/ tar zxf tinkey-<version>.tar.gz -C tinkey/ export TINKEY="${PWD}/tinkey/tinkey" alias tinkey="${TINKEY}" - Create a new wrapped data encryption key.
shell script
tinkey create-keyset \
--master-key-uri="${MAIN_KMS_KEY_URI}" \
--key-template=AES256_SIV \
--out="${WRAPPED_KEY_FILE}" \
--out-format=json
Create Cloud Storage bucket
Create a Cloud Storage bucket for storing test data and Dataflow staging location.
```shell script gsutil mb -p ${PROJECT_ID} -l ${REGION_ID} “gs://${TEMP_GCS_BUCKET}”
### Copy test data to Cloud Storage

You can use your own file datasets or copy the included demo dataset (`userdata.avro` or `userdata.parquet`).

```shell script
gsutil cp userdata.avro gs://${TEMP_GCS_BUCKET}
Compile modules
Prerequisites
The solution usesTestcontainers for database dependent unit-tests.
If you wish to skip running tests add -x test flag to gradle command.
Install Docker:
- Follow distro specific steps
- For security purpose setup Docker in Root-less mode
- Install Docker Compose using steps
Check the supported Docker versions for TestContainers before installing.
Compile
You need to compile all the modules to build executables for deploying the sample & identify and bulk tokenize pipelines.
```shell script ./gradlew clean buildNeeded shadowJar
## Run Sample and Identify pipeline

Run the sample & identify pipeline to identify sensitive columns in the data you need to tokenize.

The pipeline extracts `sampleSize` number of records, flattens the record and identifies sensitive columns
using [Data Loss Prevention (DLP)](https://cloud.google.com/dlp). Cloud DLP provides functionality
to [identify](https://cloud.google.com/dlp/docs/inspecting-text) sensitive information-types. The DLP identify methods
supports only flat tables, hence the pipeline flattens the Avro/Parquet records as they can contain nested and/or repeated fields.

### Launch sample & identify pipeline

```shell script
sample_and_identify_pipeline --project="${PROJECT_ID}" \
--region="${REGION_ID}" \
--runner="DataflowRunner" \
--serviceAccount=${DLP_RUNNER_SERVICE_ACCOUNT_EMAIL} \
--gcpTempLocation="gs://${TEMP_GCS_BUCKET}/temp" \
--stagingLocation="gs://${TEMP_GCS_BUCKET}/staging" \
--tempLocation="gs://${TEMP_GCS_BUCKET}/bqtemp" \
--workerMachineType="n1-standard-1" \
--sampleSize=500 \
--sourceType="AVRO" \
--inputPattern="gs://${TEMP_GCS_BUCKET}/userdata.avro" \
--reportLocation="gs://${TEMP_GCS_BUCKET}/dlp_report/"
Note: Use
sampleSize=0to process all records.
The pipeline supports multiple Source Types, use the following table to use the right combination of sourceType and inputPattern arguments.
| Data source | sourceType | inputPattern |
|---|---|---|
| Avro file in Cloud Storage | AVRO |
gs://<location of the file(s) |
| Parquet file in Cloud Storage | PARQUET |
gs://<location of the file(s) |
| CSV Files in Cloud Storage | CSV_FILE |
gs://<location of the files(s) |
| BigQuery table | BIGQUERY_TABLE |
<project-id>:<dataset>.<table> |
| Query results in BigQuery | BIGQUERY_QUERY |
BigQuery SQL statement in StandardSQL dialect. |
| Relational Databases (using JDBC) | JDBC_TABLE |
[TABLE_NAME], use parameters jdbcConnectionUrl and jdbcDriverClass to specify the JDBC connection details. (Details) |
| Query Results from Relational Databases (using JDBC) | JDBC_QUERY |
SELECT query, use parameters jdbcConnectionUrl and jdbcDriverClass to specify the JDBC connection details. |
The pipeline detects all the standard infotypes supported by DLP.
Use --observableInfoTypes to provide additional custom info-types that you need.
Pipeline options for Sample, Identify and Tag pipeline (DlpSamplerPipelineOptions):
| Sampling Pipeline Options | Description |
|---|---|
sourceType |
The data source to analyse/inspect. One of: [AVRO, PARQUET, BIGQUERY_TABLE, BIGQUERY_QUERY, JDBC_TABLE] |
inputPattern |
The location of the datasource: for AVRO or PARQUET, the GCS file pattern to use as input. For BIGQUERY_TABLE: Fully Qualified table name as {projectId}:{datasetId}.{tableId} format, for JDBC_TABLE, the name of the table. |
sampleSize |
(Optional) The sample size to send to DLP. (Default:1000) |
reportLocation |
(Optional) The GCS location to write the aggregated inspection results and the datasource’s AVRO Schema. Atleast one of reportLocation or reportBigQueryTable must be specified. |
reportBigQueryTable |
(Optional) The BigQuery table ({projectId}:{datasetId}.{tableId}) to write the aggregated inspection results, the table must exist. Atleast one of reportLocation or reportBigQueryTable must be specified. |
observableInfoTypes |
(Optional) Provide a list of DLP InfoTypes to inspect the data with. Keeping EMPTY uses all DLP supported InfoTypes. |
jdbcConnectionUrl |
The Connection URL used for connecting to a SQL datasource using JDBC. (Required when sourceType=JDBC_TABLE) |
jdbcDriverClass |
The JDBC driver to use for reading from SQL datasource. (Required when sourceType=JDBC_TABLE) |
jdbcFilterClause |
When using JDBC source, it is highly recommended to use a sampling filter to select random records, instead of fetching all the records from a relational database. The provided string is set as the WHERE clause of the query. (Optional when sourceType=JDBC_TABLE) |
csvHeaders |
(Optional) Provide column names when using CSV_FILE sourceType. |
csvFirstRowHeaders |
(Optional) Direct to omit first row of each CSV file and use as header. (Default: false) |
csvCharset |
(Optional) Specify the charset used for the CSV file. (Default: UTF-8) |
csvColumnDelimiter |
(Optional) Specify the character(s) used for delimiting column in a row. (Default: ,) |
csvFormatType |
(Optional) Specify the CSV format based on Apache Commons CSV. Choose from one of the CSVFormat#Predefined types. (Default: Default) |
dataCatalogEntryGroupId |
The Entry Group Id (/projects/{projectId}/locations/{locationId}/entryGroups/{entryGroupId}) to create a new Entry for inspected datasource. Provide to enable pipeline to create new entry in DataCatalog with schema. (Not used for sourceType=BIGQUERY_TABLE) |
dataCatalogInspectionTagTemplateId |
The Datacatalog TempalteId to use for creating the sensitivity tags. |
dataCatalogForcedUpdate |
Force updates to Data Catalog Tags/Entry based on execution of this pipeline. (Default: false) |
dlpRegion |
The DLP processing location to use. (Default: global) |
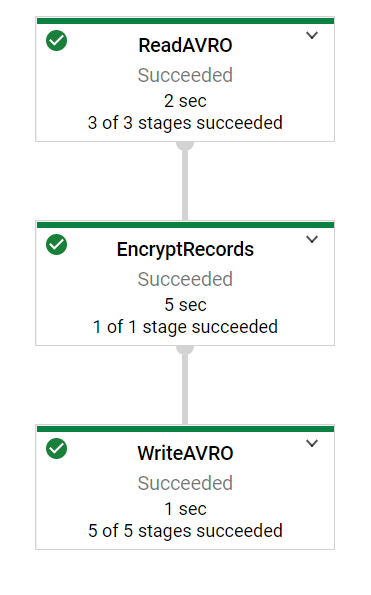
Sample & Identify pipeline DAG
The Dataflow execution DAG would look like following:

Retrieve report
The sample & identify pipeline outputs the Avro schema (or converted for Parquet) of the files and one file for each of the columns detected to contain sensitive information. Retrieve the report to your local machine to have a look.
```shell script mkdir -p dlp_report/ && rm dlp_report/.json gsutil -m cp “gs://${TEMP_GCS_BUCKET}/dlp_report/.json” dlp_report/
List all the column names that have been identified.

```shell script
cat dlp_report/col-*.json | jq .columnName
The output will match the following list.
"$.kylosample.birthdate"
"$.kylosample.cc"
"$.kylosample.email"
"$.kylosample.first_name"
"$.kylosample.ip_address"
"$.kylosample.last_name"
You can view the details of the identified column by issuing cat command for the file.
```shell script cat dlp_report/col-kylosample-cc-00000-of-00001.json
Following is a snippet of the `cc` column.
```json
{
  "columnName": "$.kylosample.cc",
  "infoTypes": [
    {
      "infoType": "CREDIT_CARD_NUMBER",
      "count": "394"
    }
  ]
}
The
"count"value will vary based on the randomly selected samples during execution.
Launch bulk tokenize pipeline
The sample & identify pipeline used few samples from the original dataset to identify sensitive information using DLP. The bulk tokenize pipeline processes the entire dataset and encrypts the desired columns using the provided Data Encryption Key (DEK).
```shell script
tokenize_pipeline –project=”${PROJECT_ID}”
–region=”${REGION_ID}”
–runner=”DataflowRunner”
–tempLocation=”gs://${TEMP_GCS_BUCKET}/bqtemp”
–serviceAccount=${DLP_RUNNER_SERVICE_ACCOUNT_EMAIL}
–workerMachineType=”n1-standard-1”
–schema=”$(<dlp_report/schema.json)”
–tinkEncryptionKeySetJson=”$(<${WRAPPED_KEY_FILE})”
–mainKmsKeyUri=”${MAIN_KMS_KEY_URI}”
–sourceType=”AVRO”
–inputPattern=”gs://${TEMP_GCS_BUCKET}/userdata.avro”
–outputDirectory=”gs://${TEMP_GCS_BUCKET}/encrypted/”
–tokenizeColumns=”$.kylosample.cc”
–tokenizeColumns=”$.kylosample.email”
#### Parameter reference:

The encryption pipeline supports two encryption modes:

<table>
  <thead>
    <tr>
      <th>Encryption Mode</th>
      <th>Parameter</th>
      <th>Parameter information</th>
    </tr>
  </thead>
  <tbody>
    <tr>
      <td rowspan="3">Fixed encryption</td>
      <td><code>--tinkEncryptionKeySetJson</code></td>
      <td>The wrapped encryption key details</td>
    </tr>
<tr>
      <td><code>--mainKmsKeyUri</code></td>
      <td>The KMS key used to wrap the tinkEncryption key. <br>In following format:<br><code>gcp-kms://projects/${PROJECT_ID}/locations/${REGION_ID}/keyRings/${KMS_KEYRING_ID}/cryptoKeys/${KMS_KEY_ID}</code></td>
</tr>
<tr>
      <td><code>--tokenizeColumns</code></td>
      <td>One or more logical column names in JSONPath format</td>
</tr>
    <tr>
      <td>DLP De-identify</td>
<td><code>--dlpEncryptConfigJson</code></td>
<td><a href="src/main/proto/google/cloud/autodlp/auto_tokenize_messages.proto">DlpEncryptConfig</a>
JSON to provide <a href="https://cloud.google.com/dlp/docs/reference/rest/v2/projects.deidentifyTemplates#DeidentifyTemplate.PrimitiveTransformation">PrimitiveTransformation</a>
for each <code>tokenizedColumn</code>.
<br>
Use the <a href="email_cc_dlp_encrypt_config.json">sample</a> configuration JSON for reference, and the <a href="https://cloud.google.com/dlp/docs/transformations-reference">transformation reference</a> to understand each of the transformations.
</td>
    </tr>
  </tbody>
</table>
<br>

The pipeline supports following destinations for storing the tokenized output.

| Destination | Description | Pipeline parameter |
| --- | --- | --- |
| File in Cloud Storage  | Stores as an AVRO file | `--outputDirectory=gs://<location of the directory/` |
| BigQuery table | uses `WRITE_TRUNCATE` mode to write results to a BigQuery Table. | `--outputBigQueryTable=<project-id>:<dataset>.<table>` |
You can use one or both of them simultaneously.

The pipeline executes asynchronously on Dataflow. You can check the progress by following the JobLink printed in the following format:
INFO: JobLink: https://console.cloud.google.com/dataflow/jobs/
Additional Pipeline options for Bulk Tokenize pipeline (`EncryptionPipelineOptions`):
| Encryption Key parameters | Description |
|----------------------------|------------------------------------------------------------------------------------------------------------------------------------------------------------------------------------------------------|
| `dlpEncryptConfigJson` | Provide a valid JSON object as per DlpEncryptCongig Proto defining the DLP configuration |
| `tinkEncryptionKeySetJson` | When using TINK based encryption, provide the wrapped KeySet generated by `tinkey` |
| `keyMaterial` | The encryption key to use for custom encryption module as String |
| `keyMaterialType` | One of `TINK_GCP_KEYSET_JSON`, `RAW_BASE64_KEY`, `RAW_UTF8_KEY`, `GCP_KMS_WRAPPED_KEY`. Default: `TINK_GCP_KEYSET_JSON` |
| `mainKmsKeyUri` | The Google Cloud KMS key to use for decrypting the TINK Key or GCP_KMS_WRAPPED_KEY |
| `valueTokenizerFactoryFullClassName` | The value tokenization class to use for non-DLP based tokenization. Default: `com.google.cloud.solutions.autotokenize.encryptors.DaeadEncryptingValueTokenizer$DaeadEncryptingValueTokenizerFactory` |
**NOTE:** Provide only one of dlpEncryptConfigJson, tinkEncryptionKeySetJson or keyMaterial
The tokenize pipeline's DAG will look like following:
### Verify encrypted result
Load the bulk tokenize pipeline's output file(s) into BigQuery to verify that all the columns specified using `tokenizeColumns` flag have been encrypted.
1. Create a BigQuery dataset for tokenized data
Replace <i><bigquery-region></i> with a region of your choice. Ensure that BigQuery dataset region/multi-region is in the same region as the Cloud Storage bucket. You can read about [considerations for batch loading data](https://cloud.google.com/bigquery/docs/batch-loading-data) for more information.
```shell script
bq --location=<bigquery-region> \
--project_id="${PROJECT_ID}" \
mk --dataset tokenized_data
- Load tokenized data to a BigQuery table.
shell script bq load \ --source_format=AVRO \ --project_id="${PROJECT_ID}" \ "tokenized_data.TokenizedUserdata" \ "gs://${TEMP_GCS_BUCKET}/encrypted/*" - Check some records to confirm that
emailandccfields have been encrypted.shell script bq query \ --project_id="${PROJECT_ID}" \ "SELECT first_name, encrypted_email, encrypted_cc FROM tokenized_data.TokenizedUserdata LIMIT 10"
Cleaning up
To avoid incurring charges to your Google Cloud account for the resources used in this tutorial, you can delete the project:
- In the Cloud Console, go to the Manage resources page.
- In the project list, select the project that you want to delete and then click Delete
 .
. - In the dialog, type the project ID and then click Shut down to delete the project.
What’s next
- Learn more about Cloud DLP
- Learn more about Cloud KMS
- Learn about Inspecting storage and databases for sensitive data
- Handling De-identification and re-identification of PII in large-scale datasets using DLP
Disclaimer
License: Apache 2.0
This is not an official Google product.